So you have just entered the world of WordPress and you are looking for ways to add more features and functionality to your website.
Well, that’s where plugins come in.
WordPress has a huge repository of plugins from developers all over the world, each catering to a different need. If you can think of a functionality or feature, there is probably a plugin out there for it.
There are 3 ways to install a plugin in WordPress:
- Installing a plugin from the WordPress Plugin repository – The WordPress repository is massive, with loads of plugins. Search for one you want and install it. It’s easy, quick, and perfect for beginners.
- Uploading a plugin manually from the WordPress Admin Dashboard – If you’ve obtained a plugin from outside the WordPress Plugin Directory, you’ll need to use this method
- Uploading and Installing a plugin via FTP – This method is a bit more technical and involves using an FTP client to manually upload the plugin files to your server.
Speaking from experience, the first two methods are really the one’s you will ever need. The FTP option is available, but you probably won’t ever use it. In my 8 years working with WordPress, I haven’t had the need to use it for installing plugins.
Installing a plugin from the WordPress Repository
Alright, installing a plugin from the WordPress repository is like picking a toy from your game chest that’s right in your living room. It’s the most straightforward method and doesn’t require you to leave your WordPress dashboard. Here’s how you can do it, step by step:
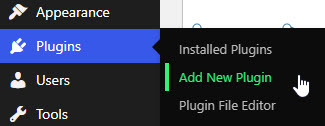
Find the “Plugins” Section: Login into the WordPress control panel. Once you’re in, look to the left side of your screen. You’ll see a bunch of options. Find and click on “Plugins”.
Add New Plugin: In the nav menu or at the top of the “Plugins” page, you’ll see a button that says “Add New”. Click it.

Search for Your Plugin: You’ll see a search bar right there on the page. Type in the name of the plugin or a keyword related to what you’re looking for. Hit enter or wait a bit, and the search will show you all the related plugins right from the WordPress repository.
Choose Your Plugin: Browse through the list and find the plugin you want. Each plugin will have a little card with details like the name, rating, description, and the number of active installations.
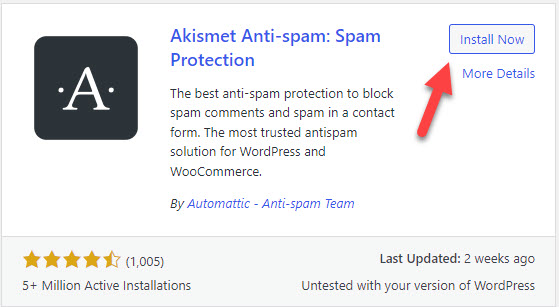
Install the Plugin: Found the one you want? Great! Click the “Install Now” button on the plugin’s card. WordPress will now download and install the plugin for you.
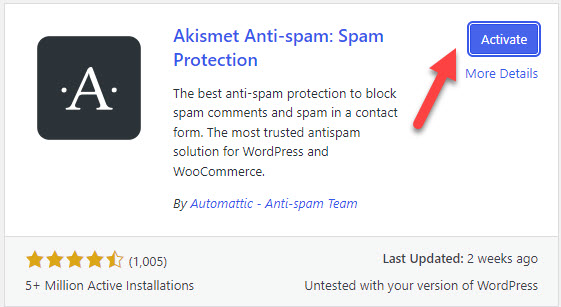
Activate the Plugin: Once the installation is complete, the “Install Now” button will change to “Activate”. Click it to turn on the plugin and it is ready to use.
Install a plugin manually from WordPress Admin
Find Your Plugin: First off, you need to pick the plugin you want to install. WordPress has a vast library, but sometimes you might need to download a plugin directly from a developer’s site. Once you’ve found the one you need, download it to your computer. It will come in a .zip file.
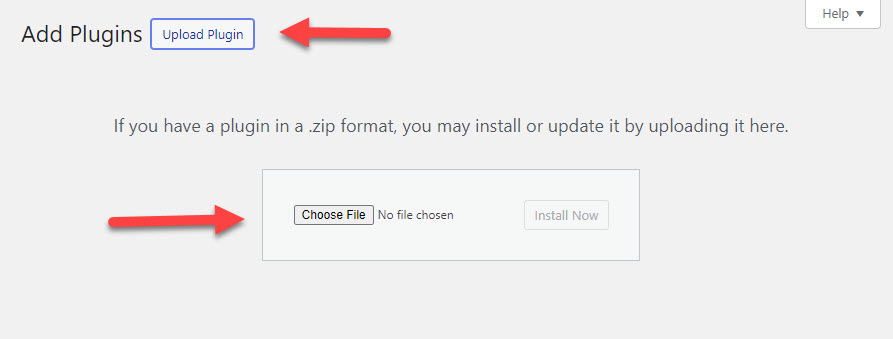
Navigate to Plugins Section: Login to your WordPress admin panel. On the left-hand side of your dashboard, you’ll see a bunch of options. Click on “Plugins,” then “Add New” at the top. But, since we’re doing this the manual way, you won’t be picking plugins from here. Instead, you’re looking for the “Upload Plugin” button at the top of the page.

Upload and Install: Hit that “Upload Plugin” button, and you’ll see an option to choose a file. Select the .zip file you downloaded earlier. Once you’ve chosen the file, there will be an “Install Now” button. Click it, and WordPress will start unpacking and installing your plugin.
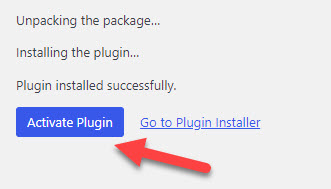
Activate the Plugin: After the installation is complete, you’ll need to activate the plugin to make it work on your site. You’ll see a link to activate it right after installation. Click it, and you’re all set!
Installing a WordPress Plugin via FTP
Get an FTP client: Before doing anything, you’ll need an FTP client, which is the software that lets you move files to your web host. Think of it as a moving van for your digital stuff. A popular choice is FileZilla, but there are many out there, so pick one that you find easy to use. Download, install it, and open the FTP client, ready for use.
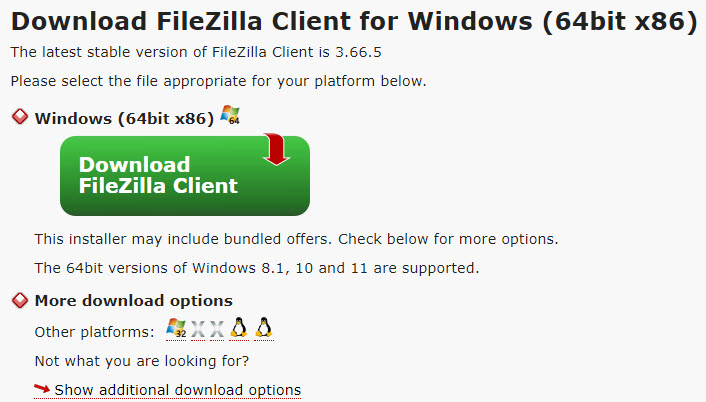
Download Your Plugin: Just like before, find the plugin you want and download it to your computer. This time, however, you’ll need to unzip (or extract) this file. Right-click on the file and choose “Extract All” or “Extract to folder name” or something similar. You’ll end up with a folder of the same name.
Connect to Your Website via FTP: Open your FTP client, and you’ll be asked for server login details like ‘host’, ‘username’, ‘password’, and sometimes ‘port’. You can find these details in the admin panel of your hosting account or by asking your web host’s support team. They’re the keys to your website’s back door.

Navigate to the Right Folder: Once connected, you’ll see the files and folders that make up your website. Look for a folder named ‘wp-content’, then inside that, another folder called ‘plugins’. That’s where you’re going to put your new plugin folder.
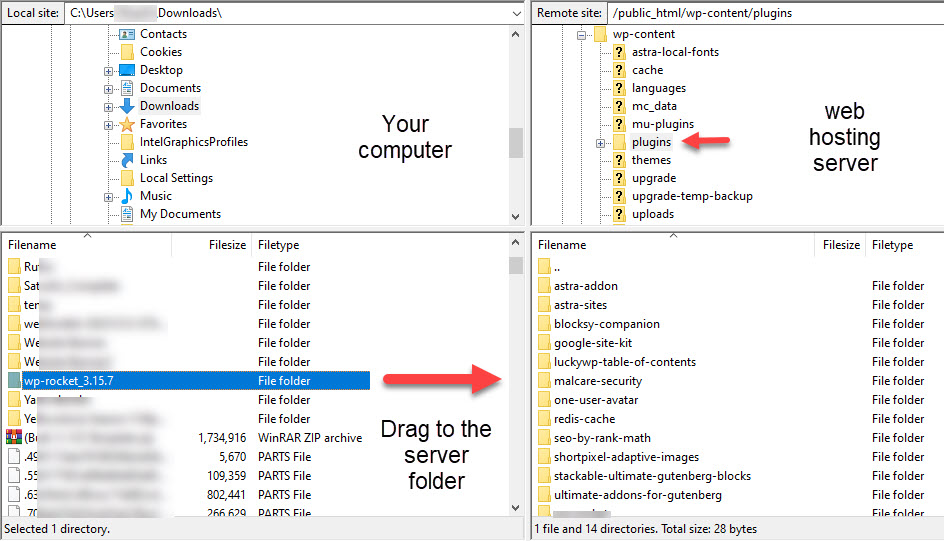
Upload Your Plugin: Now, locate the unzipped plugin folder on your computer (on the left side if you’re using FileZilla) and drag it into the ‘plugins’ folder on your website (on the right side in FileZilla). This might take a minute, depending on the size of the plugin and your internet speed. You’re essentially moving your plugin into its new home.
Activate the Plugin: Almost there! Now, log into your WordPress dashboard, go to the “Plugins” section, and you should see your new plugin listed there. All you have to do now is click “Activate” next to its name, and voilà, your plugin is live!
Wrapping Up
Depending on the plugin, there might be some settings you need to tweak to get it working just right. You can usually find these settings directly in the “Plugins” section, or there might be a new tab on the dashboard menu specifically for your new plugin.
And that’s it! You’ve installed a plugin on your WordPress site. Once you’ve done it for a few plugins, you’ll see it’s pretty straightforward.
Now, your site has some new capabilities, all thanks to a bit of digital elbow grease.
Happy WordPressing!


