Are you looking for a quick, easy way to add fonts to Google Slides presentations? Do you want to ensure that your presentations stand out from the rest? Exploring different fonts to use in your Google Slides presentation is one of the best ways to make it look professional and attractive.
In this article, I will show you how you can easily add or change fonts in Google Slides to enhance the look of your presentation.
What is Google Slides, and Why are Fonts important?
Google Slides is a powerful presentation software like Microsoft Powerpoint that allows you to create stunning presentations easily. In addition, Google Slides is a cloud-based software that will enable you to create and edit presentations on the go from any web browser.
It has a wide range of features similar to Microsoft Powerpoint, including adding fonts and customising them to your liking.
- Using different fonts in your Google Slides presentation can help you make it more attractive and engaging.
- Fonts can also emphasise specific points in your presentation and make them stand out from the rest.
What You Need to Know Before You Add Fonts to Google Slides
There are a few things you should know about fonts in Google Slides.
You can use only Google fonts in your Google Slide presentations. You cannot add or upload non-Google fonts from your computer to Google Slides. But there are external font add-ons like Extensis that you can use, which I will cover later in the article.
While this might appear to be a limitation at first glance, it is not. The Google font family comprises over 1400 fonts, with various font styles and scripts to suit every need.
The Google Slides app comes preloaded with a set of default Google fonts, and if you are looking for more options, then in a few steps, you can access the entire Google font collection of 1400+ fonts and add specific Fonts to Google Slides.
How to Change a Font in Google Slides
Before we get into the steps to add fonts to Google slides, we can select from the existing set of fonts available in Google Slides by following these steps:
1. Select the Text
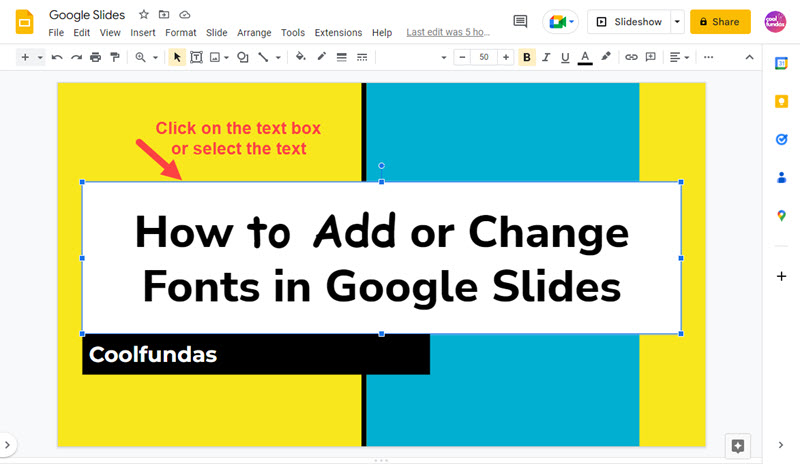
Select the Text in your Google Slide for which you want to change the font styles. You can also click on the text box to select all the text.
2. View the list of available fonts
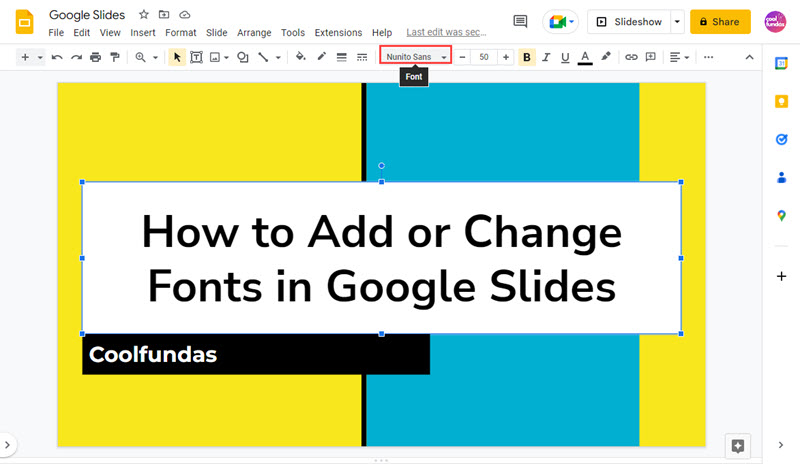
Click on the font drop down menu on top to see the list of all available fonts in Google Slides.
3. Select a font to apply to the Text
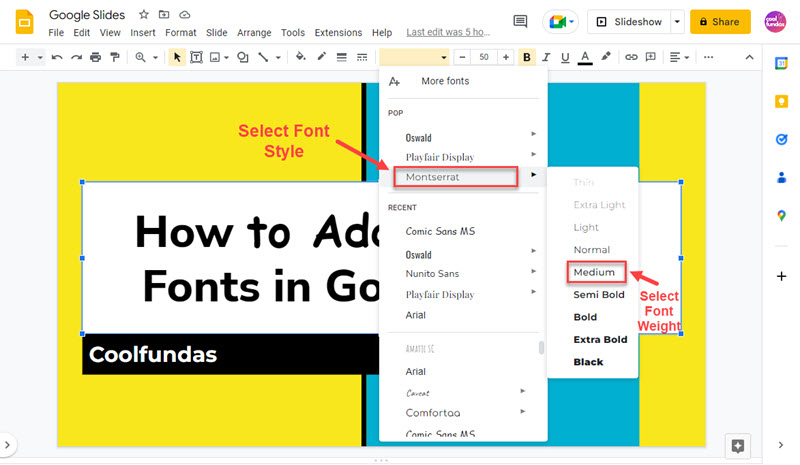
Select a font from the drop down menu to apply the Font to your selected Text. Some fonts will also allow you to choose the font-weight – Light, Normal, Bold, etc.
How to Add Fonts to Google Slides
The steps to add fonts to Google Slides presentations from the more expansive Google Fonts library is a simple process.
1. Open the Fonts Library

Open the “Fonts” tab in the top menu bar of your presentation. Then, click “More Fonts” to open the Google Font Library module.
2. Search for a Font from the Google Fonts Library
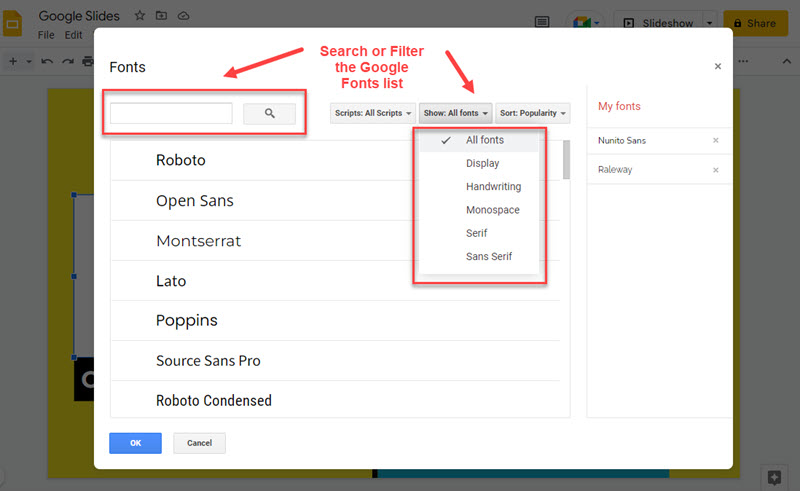
In the Google fonts module, you can use the search bar for a specific font if you already know it, or you can use the filters to shortlist from the library by the type of script or the font category you prefer. You can also sort the search results by popularity, alphabetically, etc.
3. Select the Font and Add it to My Fonts

From the font menu, select the font that you want to add to Google slides. In the example below, we have selected the font “Nunito Sans”. After selection, the Font will appear on the right-hand side under “My Fonts”. Click on OK to complete the step. Please note that you can select multiple fonts to add to your Slide library in a single step.
4. Select Text in the Slide and apply the newly added Font
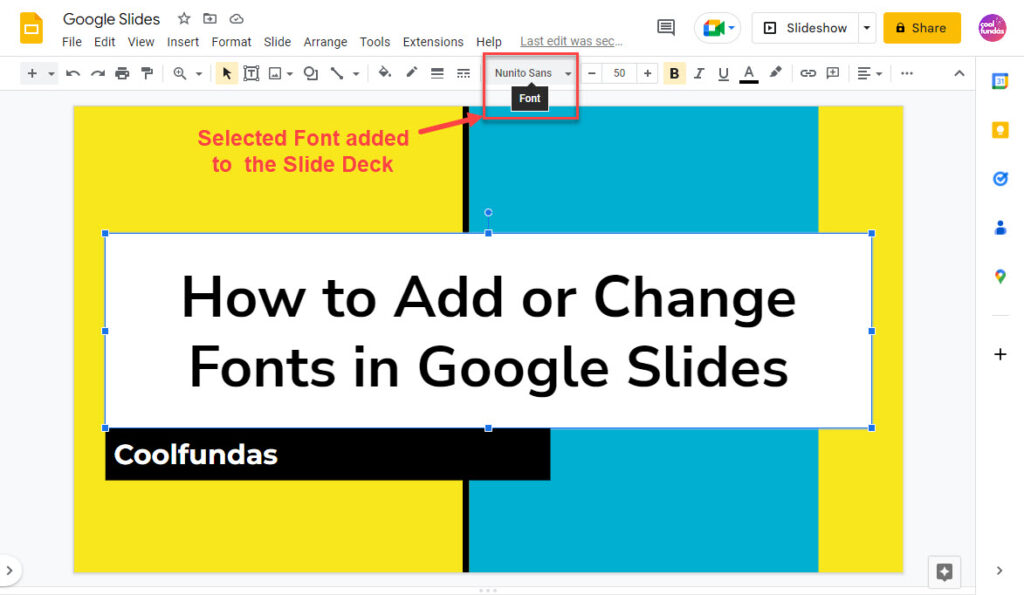
After adding the font to Google slides, you can click the font dropdown and see all the fonts you have added in the previous step. Next, select the Text from the Slide, and then select a newly added font to change the Font.
How to use the Extensis Font Add-on to Google Slides
The Extensis Font Add-on to Google Slides provides an easy way to access the entire Google Font library without going through all the steps outlined above by giving you a font panel to directly access and select one of the 1400+ Google fonts for your slide deck.
To add Extensis to your Google slides account, follow these steps:
1. Open Google Workspace Marketplace for Extensions
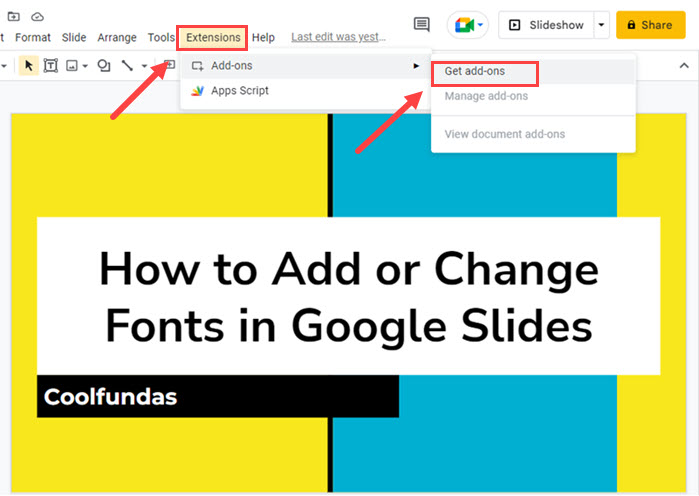
Click on Extensions in the top bar menu. Select Add-ons from the dropdown and then Get Add-Ons to open the Google Marketplace.
2. Search for the Extensis font extension in the marketplace
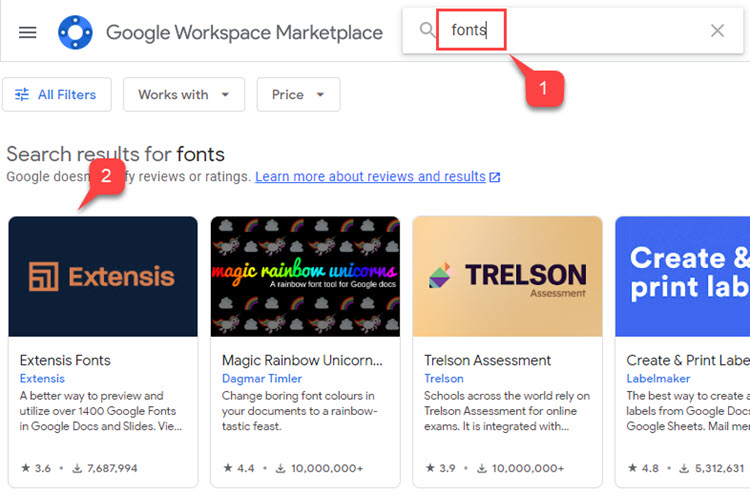
In the Google Marketplace screen, type in “fonts” or “extensis” in the search box and hit Enter to search. The search results with the Extensis Fonts add-on will be displayed.
3. Install the Extensis Add-on
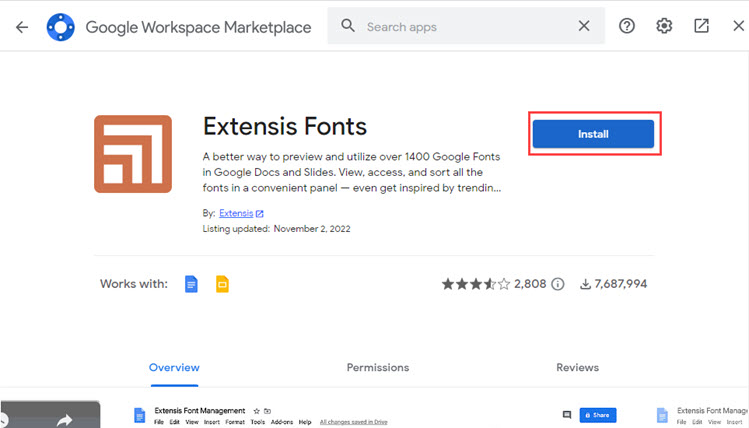
Select the Extensis add-on, and click on Install to add it to Google Slides. Next, you will need to select the Google Account you are using for Google slides and give permission to Extensis to access your Google Account.
Complete the steps on the screen to finish the Extensis Font add-on installation process.
4. Start the Extensis Font Extension
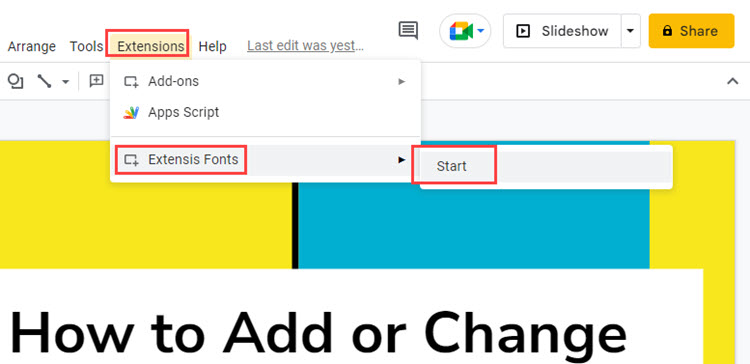
To activate Extensis, click on Extensions > Extensis Fonts > Start
5. Select the Text on the Slide, and apply a font from the Extensis Font Panel
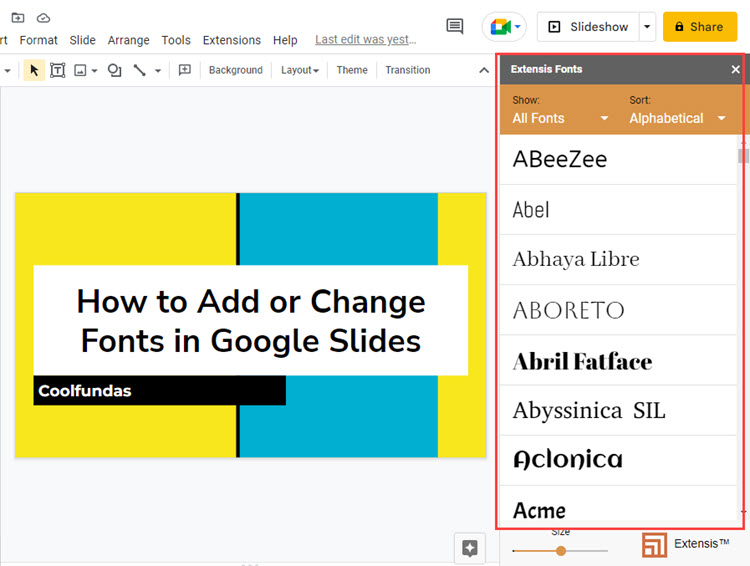
The Extensis Font panel will be displayed on the right-hand side of the Google Slide interface, allowing you to access the entire Google Font collection directly without following the Add from Library steps. Select the Text and then click on the Font in the Extensis font panel to apply the Font.
Easy, right? Add-ons can be very powerful and change the way we use productivity tools like Slides or Docs in a positive way.
Point to Note: Extensis works only with the default Google login account. So if you are logged in with multiple accounts, and the Google account you use is not the default account, you will get a failed to connect error.
To get around this, open an incognito or private window in your browser, log in with the Google account that has Extensis installed, and then open the Google Slide deck for editing. After that, the Extensis Font add-on will function correctly.
How to Choose the Right Font
Choosing the right Font for your Google Slides presentation can be tricky. There are so many fonts to choose from, and you want to ensure that you select the right one. When choosing a font, it’s essential to consider your presentation’s tone and the message you’re trying to convey.
For example, if you’re creating a more formal presentation, you may want to choose a font that looks more traditional and professional.
On the other hand, if you’re preparing a creative and informal presentation, you may want to choose a more modern and playful font.
Popular Fonts to Use with Google Slides
When it comes to choosing a font for your presentation, there are a few popular options that you should consider. Some of the most popular fonts to use with Google Slides are Roboto, Open Sans, Montserrat, and Lato. These fonts are easy to read and look great in a presentation.
You can check out this article on the best google fonts for presentations.
How to Customise Fonts in Google Slides
Customising fonts in Google Slides is easy and can help make your presentation look even more professional. You can customise fonts in two ways.
- First, you can choose to change the font size. This will allow you to make Text larger or smaller as needed.
- You can also customise the weight and style of your fonts. This will allow you to make the Text bolder or italicised, as desired.
How to Change Font Colors in Google Slides
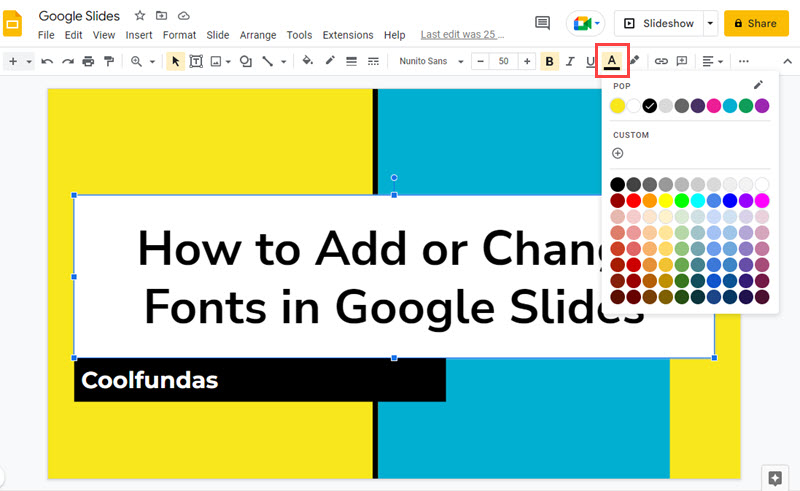
Changing font colours in Google Slides is a great way to make your presentation more visually appealing. To do this, select the text you want to change the colour of and then click the “Font Colors” button. You can choose the colour you want to use, which will be applied to your Text.
Conclusion
Adding fonts to your Google Slides presentation is a great way to make it look professional and attractive. Following the steps outlined in this article, you can easily add fonts to Google Slides presentation and make it stand out from the rest.
So what are you waiting for? Get started now and wow your audience with your beautiful Google Slides presentation!
If you found this article helpful, don’t forget to share it with your friends and colleagues so they can quickly learn how to add fonts to their Google Slides presentations.
If you also use PowerPoint for your presentations, you may find our article on How to Embed YouTube Videos in Powerpoint Presentations valuable.


