The big news from Cloudflare in 2020 was the launch of the Cloudflare APO service that goes beyond the traditional static cache that is part of the standard free Cloudflare plan. It is currently available for use with WordPress, which powers most of the websites in the world today.
By using APO, WordPress websites can see a significant improvement in Time to First Byte or TTFB, First Contentful Paint, and an overall improvement to the speed index. This helps visitors or users see your site content earlier and faster.
1. What is Cloudflare APO?
Let us take a look at what Cloudflare’s APO service delivers in contrast with the regular Cloudflare plan.
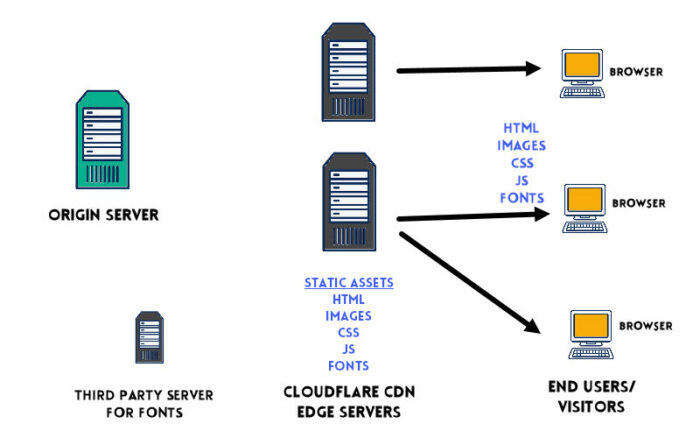
The regular Cloudflare plan only caches static assets on the Cloudflare edge network. These assets include images, CSS, and JS files. Dynamic content like HTML files and any third-party assets like fonts are retrieved from the origin or an external link at run time. While Cloudflare delivers a performance improvement by caching static assets, the extra hops to get the HTML and Third-Party resources will delay page load times.

On the other hand, Cloudflare APO goes a step further and caches HTML and font/third-party assets on Cloudflare’s Edge network. Cloudflare can deliver the complete web page directly to visitors from the closest edge server without returning to the origin server. This means fewer hops, latency, and faster load times for your website visitors.
So how does Cloudflare APO achieve this?
- Cloudflare APO uses Cloudflare Workers (Javascript Service) and Workers KV to cache dynamic content on the edge network.
- If you update content in WordPress, Cloudflare’s cache is automatically purged and refreshed with the latest content across the entire edge network without any manual intervention. It operates like a push service that keeps the CDN edge cache updated with the latest content from WordPress.
- For eCommerce/Woocommerce or websites with logged-in users, APO bypasses the cache and gets customized content specific to these users.
In a standard CDN setup, when content on the edge cache expires or is stale, if a user from a specific region requests hits a web page, Cloudflare gets the latest version of that page, updates the edge cache, and serves it back to the user. The first visitor does not benefit from the CDN since the content has to be fetched from the origin server. Every subsequent visitor will only hit Cloudflare’s edge cache and retrieve content. This is essentially a pull service where content is pulled from the origin server only when needed.
The implication of this is that the CDN will work well primarily for users in your main target region. It is quite likely that users from other locations with little to no traffic will hit the origin server and not Cloudflare’s edge cache.
The Automatic Platform Optimization service resolves this by automatically replicating the latest content across the entire edge cache network, not just a specific region’s edge cache.
If you want to know more about the working of Cloudflare’s APO service, you can read Brian Li’s take on APO.
2. How to Enable Cloudflare APO for WordPress
This section will detail step-by-step instructions to install and enable Cloudflare APO on a WordPress installation.
Prerequisites for using Cloudflare’s Automatic Platform Optimization feature:
1. Cloudflare Account
2. Your domain added to Cloudflare
3. Your domain setup with Cloudflare’s DNS and Proxy (Orange Cloud)
4. Official Cloudflare WordPress plugin
Total Time: 10 minutes
-
Install the Official Cloudflare plugin on your WordPress site

To install the Cloudflare official plugin, go to the Plugin section in your WordPress admin dashboard. Click on Add New, and search for the Cloudflare Plugin. Click Install Now to add the plugin to your WordPress server, and then Activate the plugin.
-
Get Cloudflare’s Global API Key
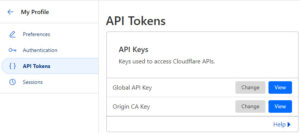
Go to your Cloudflare account and select the profile menu in the top right of the dashboard. Select the API token tab. Click on “View” for the Global API key, and enter your account password to view the Global API key. Copy the key.
-
Start Cloudflare setup
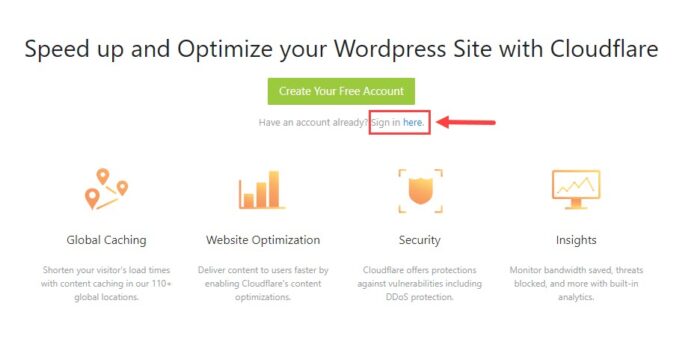
Go to the Cloudflare plugin by navigating to Settings > Cloudflare. In the setup screen, click on the Sign In Here option, as shown in the image above. The assumption is that you have already set up a Cloudflare account, as mentioned in the prerequisites.
-
Enter Cloudflare Account Credentials
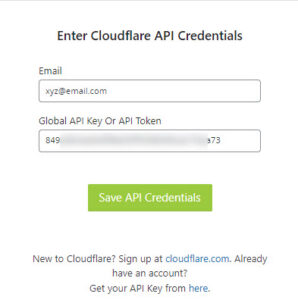
Enter the Global API key copied earlier and your Cloudflare account email ID in the fields provided on the Credentials page. Click on Save API credentials to move to the next step.
-
Configure Settings
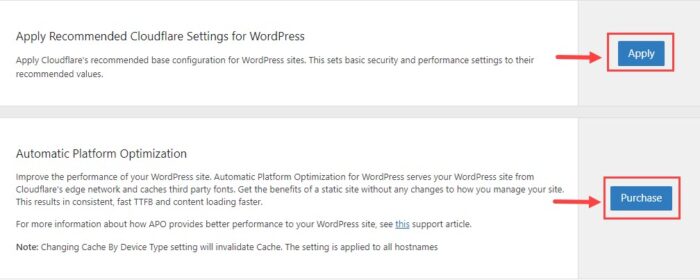
You will be presented with Cloudflare’s Plugin Home page. Apply the recommended Cloudflare settings for WordPress as the first step.
Next, you will need to subscribe to Cloudflare’s APO plan. APO is a paid plan costing $5 per month. Click on Purchase to start the subscription process.
-
Purchase APO Subscription
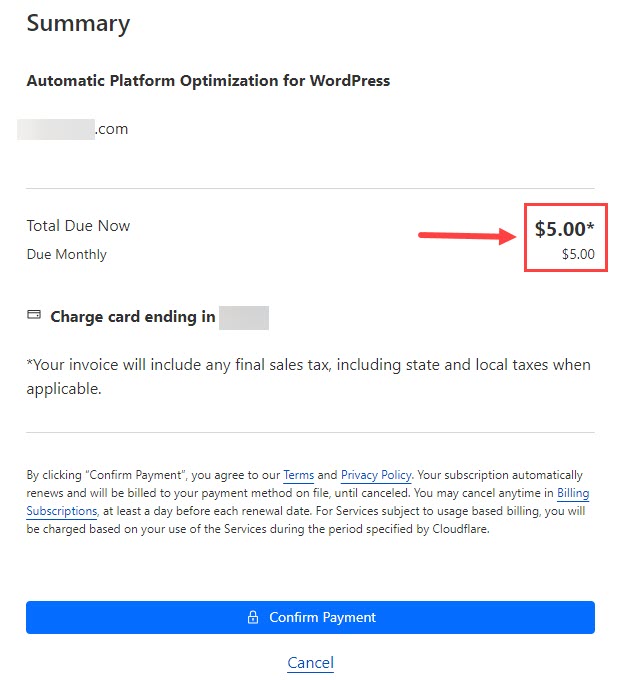
Complete the payment process to activate the APO subscription on your account.
Note: APO subscription is per domain. You must purchase APO separately for each domain if you have multiple domains on your Cloudflare account (assuming you want to enable APO on more than one domain).
Remember, the cost is $5 monthly per domain
-
Activate APO Subscription and Clear Cache Files
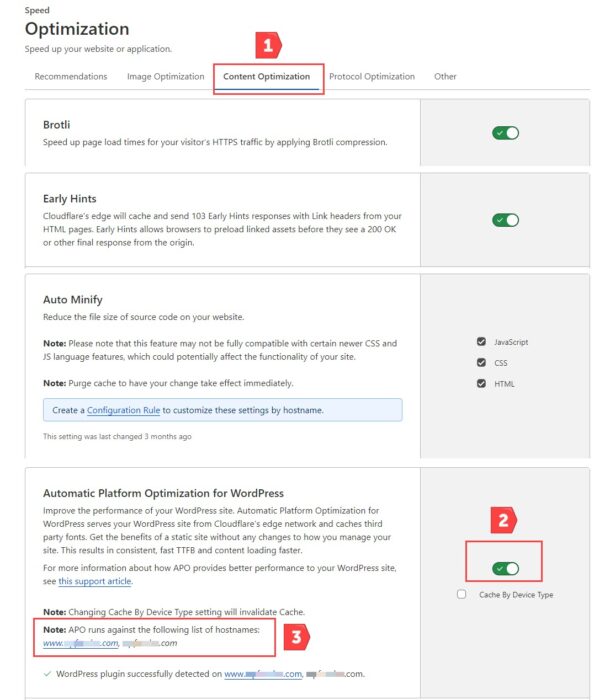
After completing the purchase of the APO subscription,
Step 1: go to Speed> Optimization > Content Optimization tab in your Cloudflare account.
Step 2: Scroll down to the Automatic Platform Optimization for WordPress section and toggle the switch to turn it on.
Step 3: If the Cloudflare plugin has been installed on your site and authenticated correctly, your domains will be listed as shown in the image above.You can also turn on/off APO in Cloudflare’s plugin settings in your WordPress dashboard.
If you want to maintain a cache for each device type (Desktop, Mobile, etc.), select the checkbox against the Cache by Device Type option.
Purge cache in Cloudflare and in any caching plugin on your WordPress installation.
-
Automatic Platform Optimization Setup Complete
If you go back to the WordPress Dashboard and look up Cloudflare plugin settings, you can see the APO feature is now in the ON position.
The setup of Cloudflare APO is now complete. The next step is to test if the Automatic Platform Optimization feature is enabled and verify the performance improvement of your WordPress website.
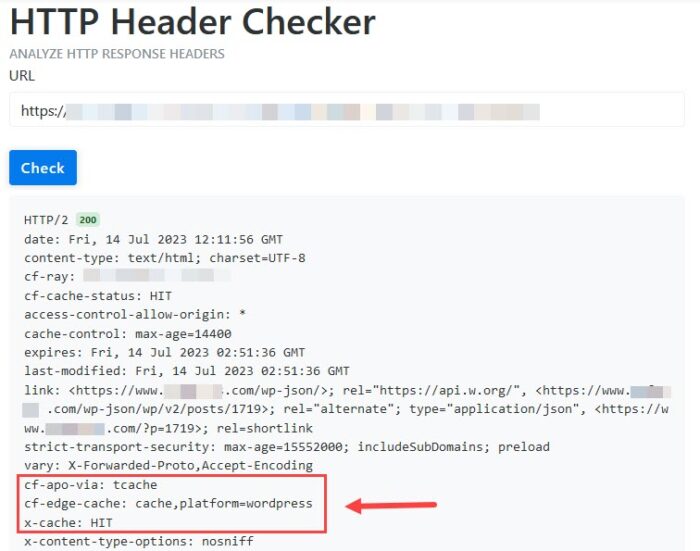
You can check if the WordPress APO integration is working on your website by using KeyCDN’s HTTP Header Checker tool. Enter your website URL and click the check button. In the response headers displayed, you will see the following:
cf-cache-status : HIT
cf-apo-via: tcache
cd-edge-cache: cache,platform=wordpressIf you don’t see HIT and tcache in the response, refresh the web page, wait for some time, and retest.
3. Verify Performance Improvement
To test the APO service, we will take a two-pronged approach.
- On the one hand, we will test for the overall performance gains for a WordPress website using APO.
- And second, we will test the performance of Cloudflare CDN /APO across the edge network
For the test, we will use a test WordPress setup that runs the Astra theme on Cloudways Hosting with a server located in Bangalore. The test website also has WP Rocket with Cloudflare free plan configured. This test website is already optimized and delivers a good performance to use as a benchmark.
Website Performance Test
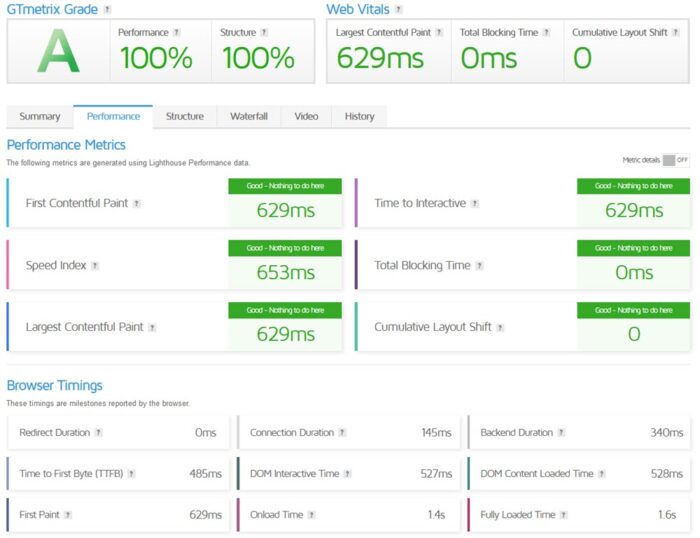
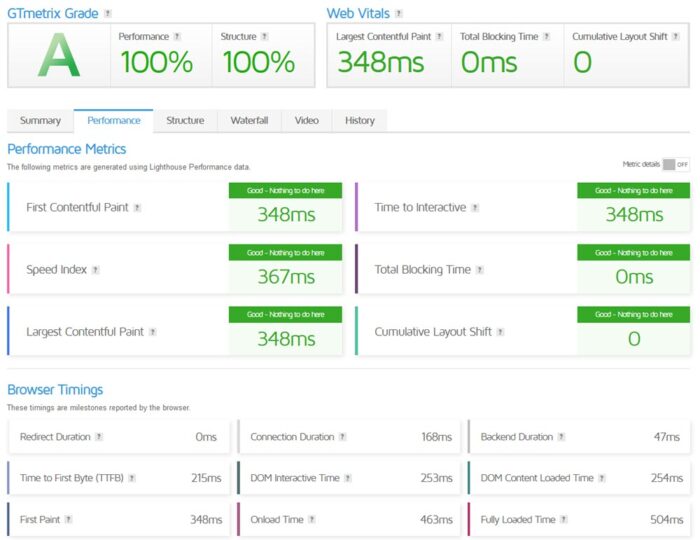
The test website was put through a performance test using GTmetrix, simulating a desktop visitor from Canada using a fast broadband connection.
Website Performance Test Results without APO enabled
Website Performance Test Results with APO enabled
Website Performance Comparison Table with and without APO
| Metric | Without APO (in ms) | With APO (in ms) | % Improvement |
|---|---|---|---|
| FCP | 629 | 348 | -45% |
| LCP | 629 | 348 | -45% |
| TTFB | 485 | 215 | -56% |
| Speed Index | 653 | 367 | -44% |
| Fully Loaded Time | 1600 | 504 | -69% |
The test results and the comparison show that Automatic Platform Optimization has significantly improved the performance of the WordPress website. The Time To First Byte, or TTFB, has improved by 56%, and the overall page load time has decreased by 69%. This is a big difference from a user’s perspective.
CDN Performance Test
For this test, we used the CDN performance test tool from KeyCDN. The test simulates visitors from multiple locations worldwide and displays performance data for each location. This test will focus on the TTFB time, a critical metric that APO should improve significantly.
CDN Performance Test Results without APO enabled

CDN Performance Test Results with APO enabled
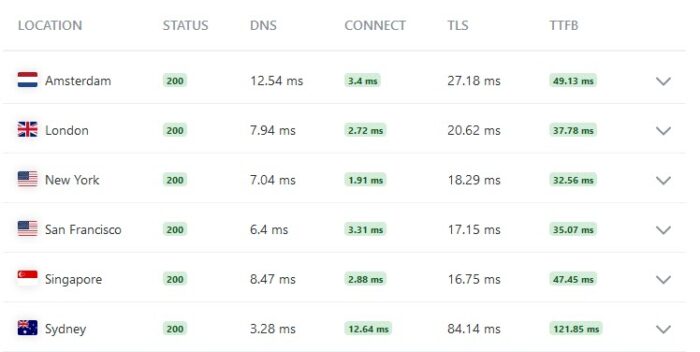
CDN Performance Comparison Test Results
A quick glance at the before and after APO test results snapshot above shows that the TTFB time has improved significantly. A summary of the results across continents shows:
- TFFB time for Amsterdam has come down from 793 ms to 49 ms, a decrease of 94%
- TTFB time for New York has come down from 1.07 s to 32 ms, a decrease of 97%
- TTFB time for Sydney has come down from 608 ms to 121 ms, a decrease of 80%
- The average TTFB time across the 6 locations has decreased from 725 ms to 54 ms, a decrease of 93% overall.
The test data proves that APO can make a difference in how a WordPress website performs for a worldwide audience.
4. APO and Performance Optimization
You can skip this section if you are familiar with performance optimization, caching, and CDNs and their benefits. If you have just started looking at ways to speed up your WordPress website and came across APO, read on for more context and information to help you decide whether you need APO.
All of the setup options discussed below impact two key variables in a website’s performance:
(1) the time required to process a visitor request and deliver a completed web page and
(2) the distance from the visitor’s location that the request and response data packet has to travel (latency).
Let us go through the setup options one by one:
- Standard WordPress website
- Every visitor to the website is directed to your hosting server for a response.
- The server processes the request, builds the entire web page, and sends back HTML, JS, CSS, and Images to the visitor’s browser. External fonts like Google fonts are retrieved from the Google server.
- This process is repeated for every visitor request. If you have 500 visitors a day, the server has to process 500 requests and send a response.
- WordPress Website with Caching
- The website has a caching plugin like WP Rocket, WP-Optimize, or FlyingPress configured.
- The caching plugin builds the web page and stores it in a cache on the server.
- The visitor is directed to your hosting server for a response.
- The server serves the web page from the cache and any static assets like CSS, JS, Images, etc.
- The page loads faster for the visitor since the server does not need any processing and can serve the web page from the cache.
- WordPress Website with Caching and Cloudflare’s Free CDN
- The caching plugin stores web pages in the server cache, and all static assets like CSS, JS, and Images are stored in Cloudflare’s edge network worldwide.
- When a visitor requests a page from your website, the hosting server will respond with the HTML from its cache, while all static assets are served from Cloudflare’s edge cache closest to the visitor’s location. Fonts come directly from the third-party server.
- The page loads faster for the visitor due to reduced processing time (page caching) + reduced latency for static assets served from the closest edge cache (CDN).
- WordPress website with Caching, Free CDN, and APO
- The website has page caching, and the entire web page (static and dynamic content) – HTML, CSS, JS, Images, and fonts, are stored in the CDN edge cache courtesy of APO.
- A visitor to the website is directly served from the edge cache, with no need to go back to the origin server unless custom content is involved – an eCommerce cart/checkout scenario or a logged-in user where personalized content needs to be served.
- The advantages of this approach are no processing time and minimal latency with static and dynamic content served from Cloudflare’s closest edge location.
A performance test of the above setup options using our test bed yielded the below data. It gives a good picture of the difference in performance.
| Metric (in seconds) | Standard WP Site | WP + Caching | WP+ Caching +CDN | WP + Caching + CDN + APO |
|---|---|---|---|---|
| FCP | 2.0 | 1.2 | 0.62 | 0.35 |
| LCP | 2.0 | 1.2 | 0.62 | 0.35 |
| TTFB | 1.1 | 1.1 | 0.48 | 0.22 |
| Speed Index | 2.0 | 1.2 | 0.65 | 0.37 |
| Fully Loaded Time | 2.4 | 1.7 | 1.6 | 0.50 |
Page Caching, CDN Edge Cache, and APO add increasing levels of speed and efficiency to a WordPress website and its ability to handle and deliver user requests quickly. The internet is extremely competitive so every little factor will make a difference – Speed is one of those key factors not only from a user experience perspective but in terms of your SEO efforts as well.
5. Conclusion
Undoubtedly, the Cloudflare Automatic Platform Optimization or APO service delivers a good performance bump to a WordPress website at a very affordable cost. The cheapest Cloudflare plan is the Pro plan at $20 per month, which may not be an option for most WordPress website owners.
If you are running a small or medium WordPress website or eCommerce store, and you can afford the monthly $5 cost, then the APO service is probably what you need to deliver a better and faster experience for your users or customers.
6. Frequently Asked Questions (FAQ)
That depends on how your site is set up. If there are mobile-specific pages or your theme uses a dedicated mobile plugin, you should have separate cache files for Mobile devices.
In the APO settings, select the Cache by Device type option. You must also activate the cache by device type option in your Caching plugin.
On paper, this sounds like a great idea. APO might look like a wrapper delivering excellent performance to the end user and minimizing or hiding origin server issues.
I would not recommend it. APO has to connect to your host server to sync the content, and your site still has vital tasks to ensure a reliable WordPress site. Using a good hosting solution like Kinsta or Cloudways is essential. APO can only enhance it and make it better for your users.
No, you don’t need to buy Cloudflare Pro to use APO. The APO feature is a stand-alone service at $5 monthly that you can use with the Cloudflare free plan.
APO is compatible with most WordPress page caching plugins like WP Rocket, Flying Press, Object Cache Pro, etc.
The role of the caching plugin is different from APO. The caching plugin operates at the origin server level, while APO works at the CDN level. There is no inherent conflict in their role in powering a website.
You can check the complete list of plugins compatible with APO.
You can refer to Cloudflare’s troubleshooting and FAQ section for known issues and solutions.
If you have page rules set up, there may be some conflicts with resources served by APO. Check for the same.
If you use Cloudflare’s free plan, you cannot contact Cloudflare support directly. Your only recourse is the Cloudflare community boards- You can search for your issue there or start a discussion thread. The community is pretty active, and people are helpful.

