If you are here, you are probably optimizing your website and looking at ways to make it faster so your visitors get fast-loading pages. You may have already purchased WP Rocket, or at least you are considering it for purchase. The next step is to obviously integrate a CDN, and using WP Rocket with Cloudflare is on your radar.
This is a journey I have taken a few years back, so I can assure you that you are on the right path. This website runs on WP Rocket with Cloudflare and has seen significant performance improvements. I will run through all the steps needed to integrate the WP Rocket plugin and Cloudflare and get it up and running.
If you are still on the fence regarding WP Rocket, you can read our detailed review of WP Rocket to understand its key features, pros, and cons.
1. Why Integrate Cloudflare with WP Rocket Plugin
WP Rocket also provides a CDN service called RocketCDN which costs $7.99 a month. This is a premium service powered by Stackpath CDN. Cloudflare has a much wider edge network worldwide, and the free Cloudflare plan is the right one to start with.
Technically speaking, Cloudflare will work with a domain without directly integrating WP Rocket. The only prerequisite for setting up Cloudflare with a website is:
- A Cloudflare account with your domain added to the account.
- Using Cloudflare DNS server as the name server for your domain. Your website traffic has to be routed through Cloudflare DNS for the CDN service to work (Cloudflare DNS entry should show an Orange Cloud).
But using the WP Rocket integration will simplify life by applying default settings for the integration and syncing Cloudflare caching system with WP Rocket so that a cache purge in WP Rocket will also purge Cloudflare cache, when you are using the Cloudflare Cache Everything rule.
2. How To Setup WP Rocket with Cloudflare
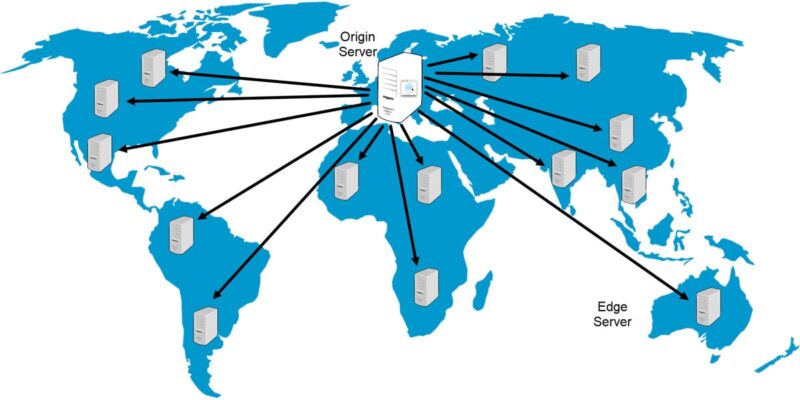
Cloudflare is a Content Delivery Network with a distributed set of servers located worldwide that helps deliver content to your site visitors from the server closest to their location. This How-To article will list all the steps required to connect WP Rocket with Cloudflare for your site and set it up correctly.
Total Time: 10 minutes
-
Create a Cloudflare Free Account
If you already don’t have one, you can follow the steps outlined in the article How to Setup a Cloudflare Free CDN Account to get one. Once you have set up a Cloudflare account, go to the next step.
-
Activate Cloudflare Add-on in WP Rocket settings
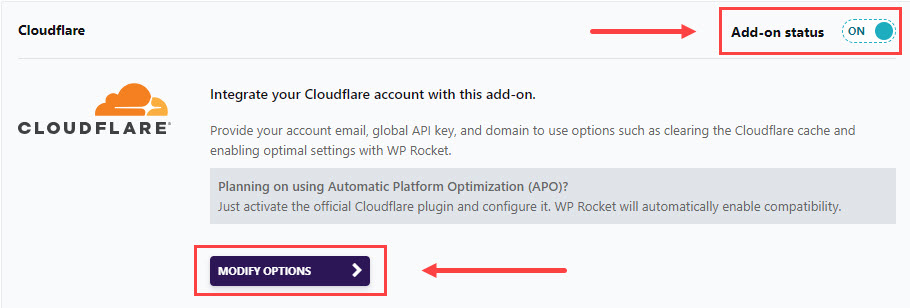
Go to the Add-Ons tab in WP Rocket’s settings. First, you must toggle the Cloudflare Add-on status on the top right of the box.
After enabling, a Modify Options button will be displayed. Click to start the process of connecting WP Rocket with Cloudflare.
-
Enter Cloudflare Credentials to connect with WP Rocket Page Cache

You will need your Cloudflare account’s Global API key, Account Email, and Zone ID to activate the connection. Head to your Cloudflare account to get this information. We will return to this step once we have the required credentials.
-
Get the Global API Key from Cloudflare

Sign In to Cloudflare, go to the profile menu in the top right of the dashboard, and select the API token tab.
Use the View option for the Global API key. You will be asked to enter the Cloudflare account password. Enter the password to view the key. Copy the key.
-
Get the Zone ID from Cloudflare

The Zone ID for your Cloudflare account is available on the Overview page of the Cloudflare site. Scroll down the page to Zone ID in the right sidebar. Use the Click to copy option to copy the Zone ID
-
Enter Credentials in WP Rocket Settings

Now that you have all the Cloudflare credentials ready, go back to the Add-Ons tab for Cloudflare and enter them in the fields provided and Save.
-
Cloudflare and WP Rocket Optimal Settings
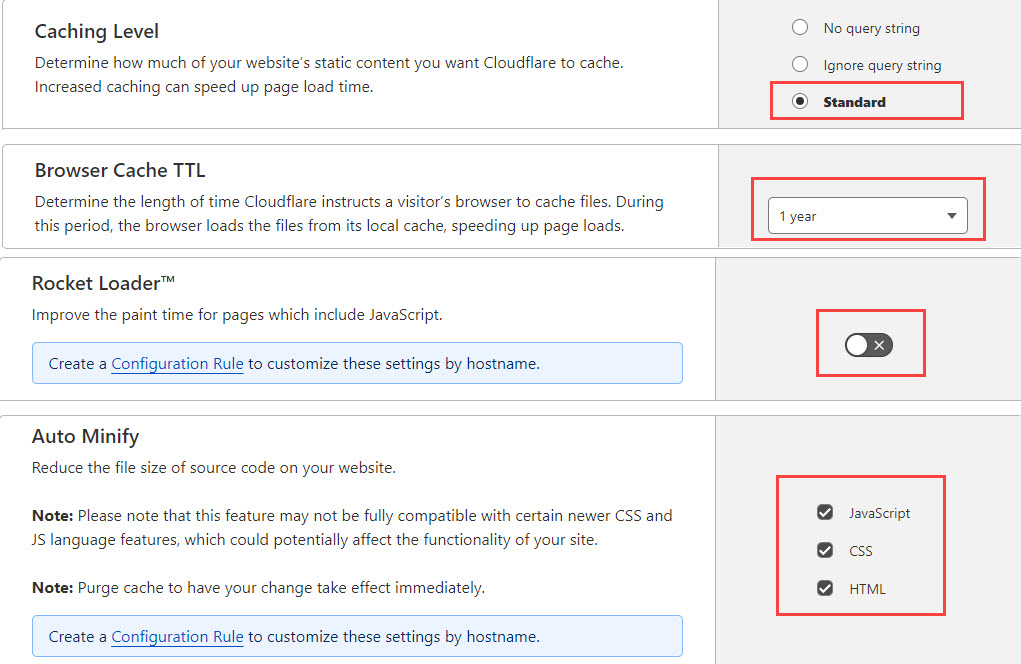
Enable the Optimal settings option using the toggle.
The Optimal Settings will automatically set the following options on the Cloudflare panel:
Cache Level and Expiration Settings are in the left navigation panel in Cloudflare under Caching > Configuration.
* Caching Level option is set to Standard
* Browser Cache Expiration is set to 1 year
Minify and Rocket Loader Settings are under Speed > Optimization > Content Optimization.
* Enable Auto Minify for JavaScript, CSS, and HTML.
* Rocket Loader is disabled to prevent conflicts. -
WP Rocket Add-On Integration with Cloudflare CDN Complete
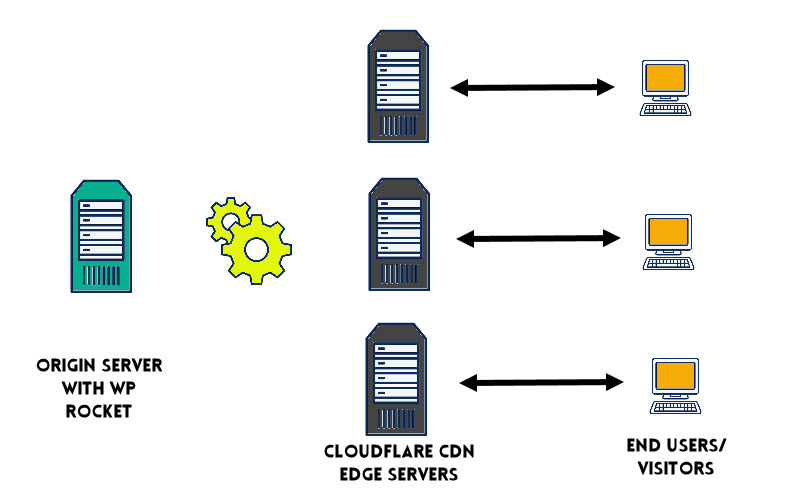
The integration of WP Rocket with Cloudflare is now complete, and you can now test the performance of your site with both WP Rocket and Cloudflare enabled.
3. Testing Performance with Cloudflare and WP Rocket enabled
There are two angles to testing the Cloudflare integration with WP Rocket.
- One is the improvement in speed with the use of Cloudflare.
- The second is to test how the website works across the Cloudflare Edge network.
We ran a performance test using a WordPress site on a test domain. The WordPress site is running the WP Astra theme on Cloudways hosting with WP Rocket running with Cloudflare integrated. The test page is a post page with text and images.
The performance test results using Gtmetrix can be seen in the image below.
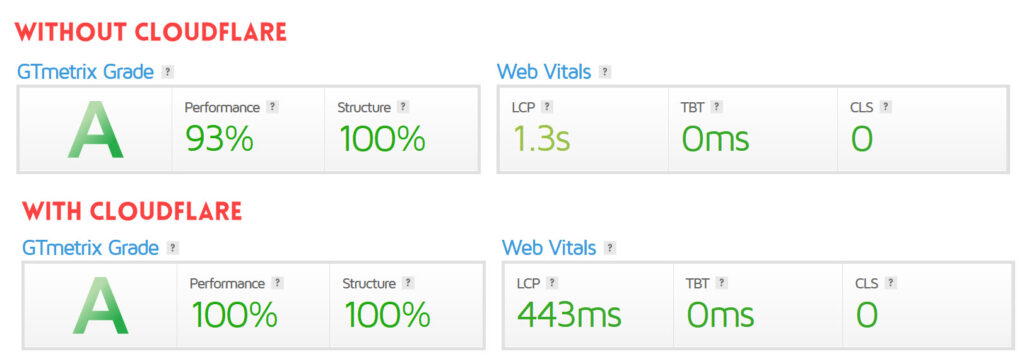
These results show that using Cloudflare CDN has significantly improved overall performance and lowered the LCP time from 1.3 seconds to less than 0.5 seconds.
To test whether your WordPress site is replicating and caching across the Cloudflare edge network, you can use the Uptrends CDN performance tool or the KeyCDN performance test tool.
These tools connect to your site from multiple locations across the world and report the performance of your site from those locations. It also includes the response headers, from where you can check the CF-Cache-Status=HIT to confirm that they were served from the Cloudflare cache.
See the report for the sample test page from the Uptrends tool below.
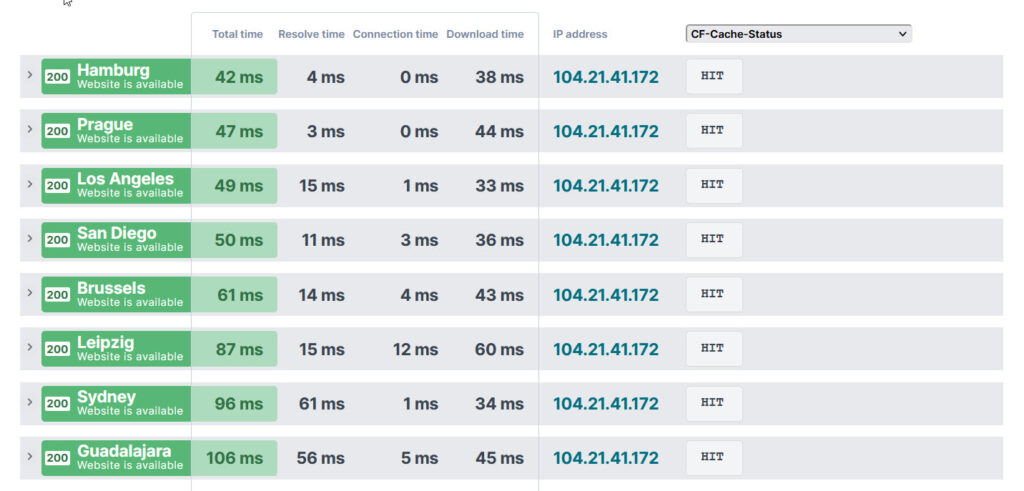
From the report, we can observe that the WordPress website is showing fast loading times across multiple locations, and the CF-Cache-Status=HIT. This level of performance would not have been possible if all the locations were connecting to the origin server to load the page.
4. Wrapping up: WP Rocket Cloudflare Integration
Integrating a cache plugin with a CDN is the first step for most WordPress website owners to get the best performance for their website. The ease of use of this plugin combined with Cloudflare’s free content delivery network is a popular combination, and you can’t go wrong.
WP Rocket has an excellent knowledge base available in the documentation section of their website, and you also have access to support from WP Rocket if you run into issues configuring the plugin for Cloudflare.
Let us know your feedback or any questions you have in the comments section below.
5. Frequently Asked Questions
Why is Cloudflare Rocket Loader disabled for use with WP Rocket?
The Rocket Loader feature from Cloudflare is known to conflict with WP Rocket, resulting in display issues or Javascript errors. If you encounter any issues, disable the Rocket Loader. If the Optimal Settings option is turned on in the WP Rocket settings panel, it will automatically turn off the Rocket Loader.
Can I use Super Page Cache for Cloudflare with WP Rocket?
Yes, you can use Super Page Cache for Cloudflare with WP Rocket. Both plugins provide page caching, but WP Rocket has additional optimization features like minifying CSS and JS, Lazy load of images, Cache Preload, and so on. The Super Cache for Cloudflare plugin is focused primarily on page caching with strong integration with Cloudflare and a disk level fallback cache.
Remember, you can use only one of the plugins to deliver the page caching feature. If you plan to enable:
(1) Cloudflare Super Page Cache for page caching, and
(2) WP Rocket for its optimization features.
Then you will need to turn off the page caching for WP Rocket using a helper plugin.
How do I use Cloudflare APO with WP Rocket?
You will need to use the official Cloudflare plugin to activate Cloudflare APO. Install and configure the Cloudflare plugin and activate the APO feature.
From version 3.14, the WP Rocket plugin is compatible with Cloudflare APO, with cache clearing synchronized between the two.
Note: After the official Cloudflare plugin is activated, the Cloudflare add-on in WP Rocket will be dimmed/disabled. Your website’s integration with the CDN will be through the official Cloudflare plugin instead of the WP Rocket plugin.


