If you have a website, then a CDN is one of the fastest ways to improve the load times of your WordPress website. Unfortunately, most companies only offer paid plans for their CDN services. But Cloudflare provides a free CDN plan along with a few key features. I will walk you through the steps to setup Cloudflare free CDN plan for your website.
What is a CDN?
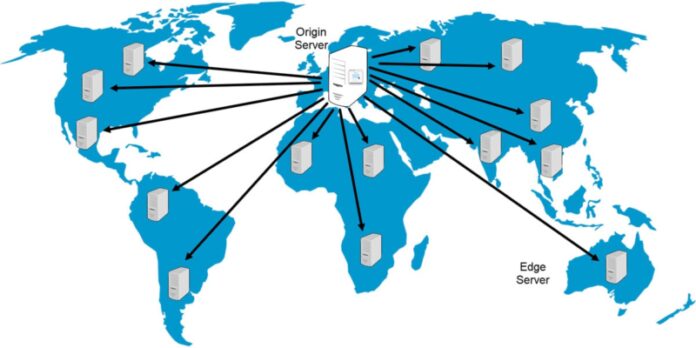
CDN, or Content Delivery Network, is a distributed set of servers located worldwide that helps deliver content to your visitors from the server closest to their location.
If you are hosting your website on a server in the USA, then visitors from geographically distant locations like countries in Europe, Asia, the Middle East, or South America would see a delay or take longer for your website’s web pages to load for them.
The longer the distance, the more latency your visitors experience.
The companies providing CDN services set up “Edge servers” in locations worldwide. When you sign up for a CDN service, the static content of your website will be replicated worldwide to these edge servers.
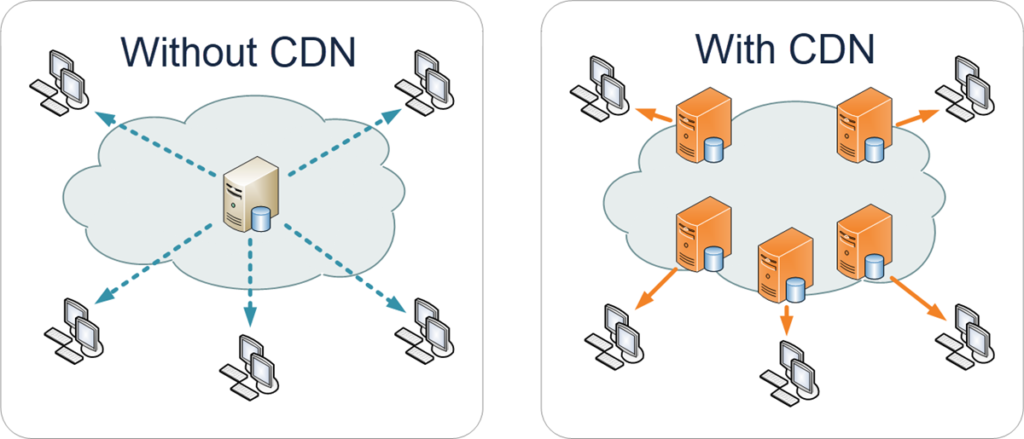
With the CDN in place, a visitor to your site will not need to hit your server in the USA. Instead, the CDN will serve the web page to the visitor’s browser from the closest edge server. For example, if your visitor is from Japan, they will probably be getting the content delivered from an edge server in Hong Kong. This reduces the distance for the data to travel, thus reducing latency.
Deploying a CDN service is a recommended way to speed up a WordPress website and improve user experience.
To learn more about CDN, read this article on What is a CDN and its benefits.
What is Cloudflare CDN?
Cloudflare is the most popular CDN provider on the internet today. It is estimated that 20% of all websites use Cloudflare today. In addition, Cloudflare has an edge network that is one of the best, with 95% of the connected world within 50 ms of a Cloudflare server.
Cloudflare has a free plan, along with paid plans. The Cloudflare free plan is great for individuals and small businesses with a limited budget. The Cloudflare free plan offers the following features:
- DNS Resolver services – use Cloudflare nameservers as your DNS service. Cloudflare DNS resolver is one of the fastest in the world and is highly recommended.
- DDoS Protection – protects your website from DDoS attacks (Distributed Denial of Service)
- CDN Services – replicates your content on edge servers worldwide and delivers fast load times to your users or visitors
- SSL certificate (free) – secures data transfers between you and your website’s visitors—peace of mind for every website owner.
All the above services are offered free under the Cloudflare free plan. This is excellent value for money for anyone looking for the first level of protection and fast content delivery.
Steps to setup Cloudflare free CDN in WordPress
Let us start with signing up for the Cloudflare plan, then proceed to add your domain to Cloudflare, and finally, how to integrate it with your WordPress website.
Total Time: 10 minutes
-
Sign Up for a Free Cloudflare Account

Go to the Cloudflare website and click the “Sign Up” button to create a new free Cloudflare account.
-
Enter Sign-Up Information

Enter the email address and password for your new Cloudflare account. Make sure you note down or save the Sign-up information for future login.
-
Select the Cloudflare Service

Select the Cloudflare service you need. In this case, we are looking to accelerate and protect your website. Select this option and click on “Get Started”.
-
Add your Website’s Domain to Cloudflare
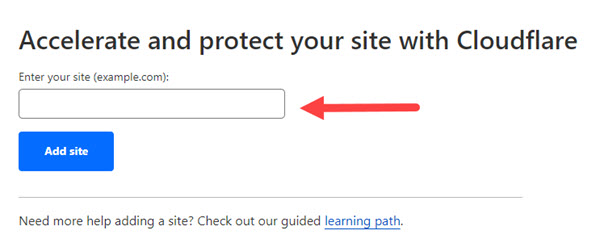
Enter the domain name of your website in the field provided, and click on “Add Site”
-
Select the Free Cloudflare Plan
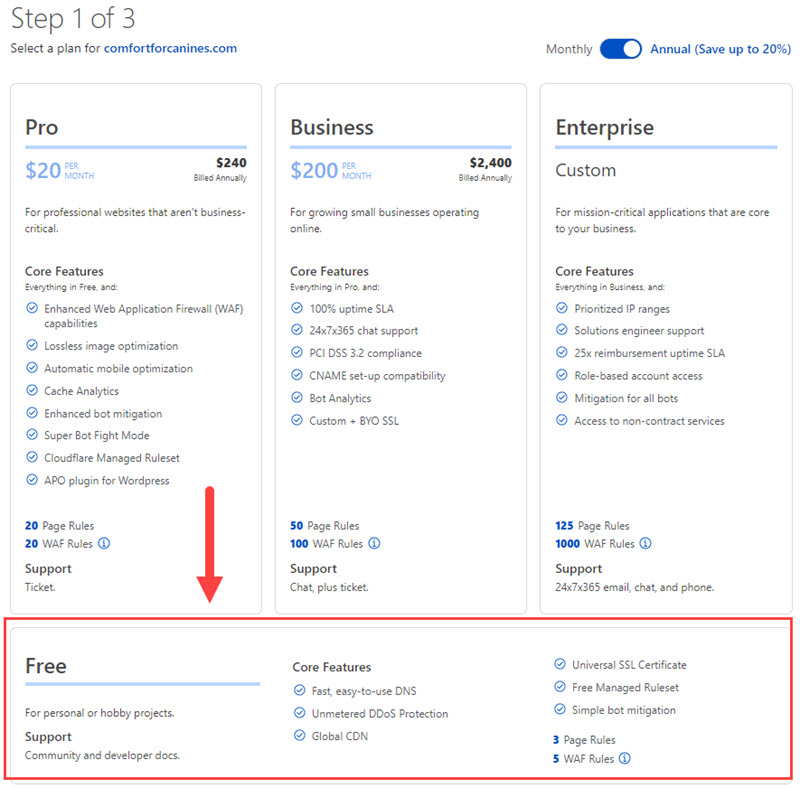
Cloudflare offers a choice of Pro, Business, Enterprise, and the Free plan. Select the “Free” plan from the list and click on “Continue”.
-
Review DNS Entries
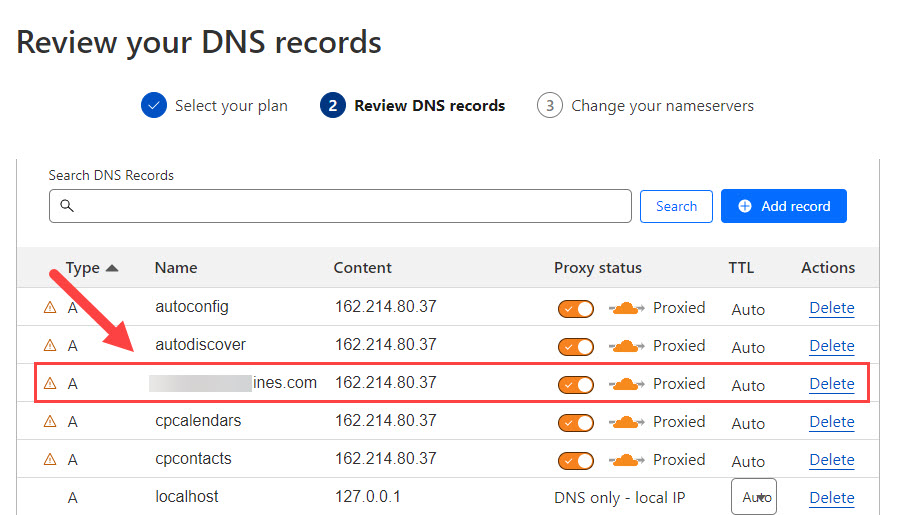
Cloudflare will scan for existing DNS records for your domain name and list all the records it finds. You must review these DNS records and compare them with your existing records. If any entries are missed out, use the “Add record” feature to add the missing entry.
Once you are happy and everything looks okay, click “Continue” to move to the next step.
-
Update your Nameservers
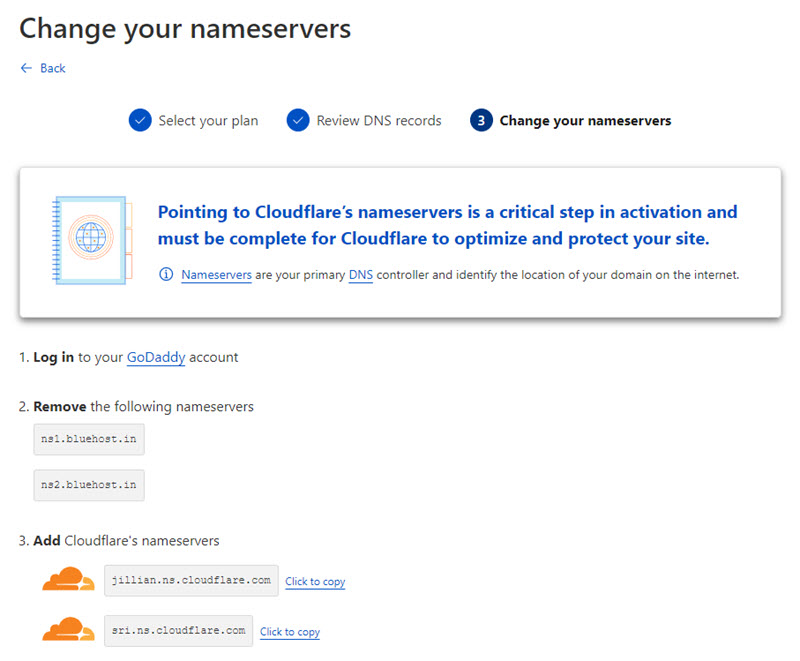
This is the final step of routing your domain via Cloudflare. You must log in to your domain registrar and change the nameservers. In our example, GoDaddy is the domain registrar. So we will need to log in to the Godaddy Account, browse to the DNS management section, and change the nameservers on GoDaddy to the new servers provided by Cloudflare.
Depending on your registrar, it can take up to 24 hours for the change in nameservers to propagate worldwide.
You can notify Cloudflare to verify the nameservers have been updated by using the “Check Nameservers” option.
-
Configure Security and Performance Options

With the DNS configuration settings done, the next step is configuring a few security and performance options to complete the process. Finally, click on the “Get Started” button.
-
Set up Automatic HTTPS Rewrites
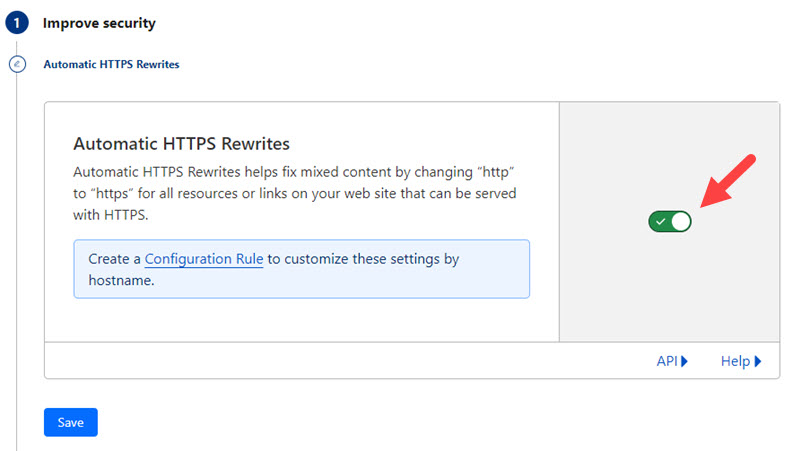
The first step is to turn on automatic HTTPS rewrites. This converts all mixed content into https content, ensuring that all the content delivered to your website visitors is secure. Next, turn On the feature, and click the “Save” button.
-
Turn On Always Use HTTPS
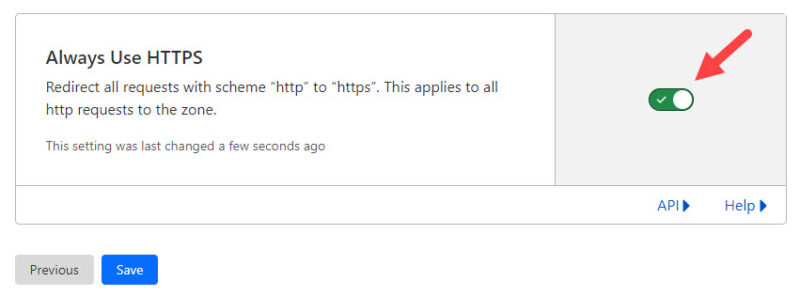
Turn On the Always Use HTTPS setting and click on the “Save” button. This ensures all traffic from your website is encrypted.
-
Turn on Brotli Compression
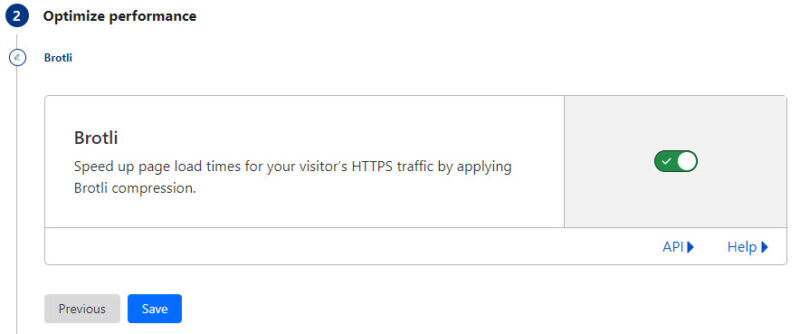
Brotli Compression is like GZIP compression. It compresses the files being transferred between your CDN server and the browser and makes it smaller. The smaller the file, the faster the transfer and load times for website users.
Turn on Brotli compression, and click on the “Save” button.To learn more about compression, you can read this article on GZIP and WordPress compression. Brotli is an alternative to GZIP and operates on the same principle.
-
Finish Cloudflare free CDN Setup for WordPress
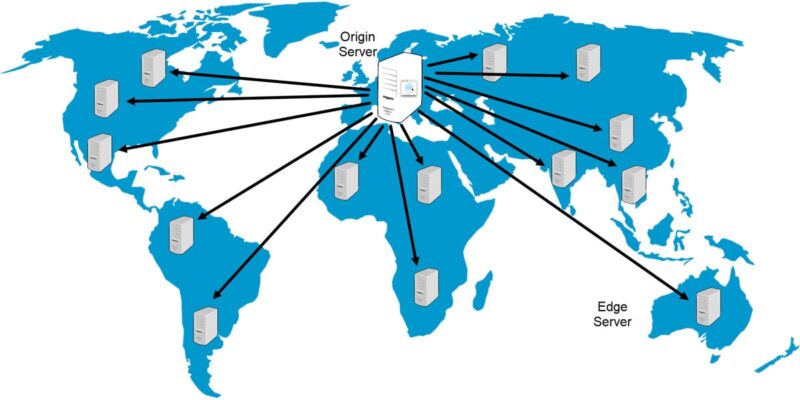
You have completed adding your domain, verified DNS entries, changed nameservers to Cloudflare, and set up security and performance options. The free Cloudflare CDN setup for WordPress is now complete and is ready to power your website. The website content will automatically cache on Cloudflare’s edge servers and serve it directly to your website visitors.
Advanced Settings for Cloudflare
With the basic Cloudflare for WordPress setup in place, your website will start to see the benefits of having a CDN. But there is much more that Cloudflare offers, and with a few additional settings, you can take advantage of them.
This doesn’t mean you should turn on every feature you can find. Some of them may not deliver what you expect or might conflict with existing settings or plugins on your website. Take these only as recommendations, and test the stability and performance of your website with any changes you make. If the website breaks, then revert the settings.
I will provide a quick rundown of the settings you can explore and the benefits they will provide.
SSL/TLS Setting
- Browse to SSL/TLS > Edge Certificates and scroll to TLS 1.3 section and Enable
- TLS 1.3 is the latest version of the encryption protocol used by HTTPS for communication. This version is faster and more secure.

Bot Fight Mode
- Browse to Security > Bots, and ensure the Bot Fight Mode is disabled.
- Bot fight mode is a great feature, but it inserts a javascript into your page, affecting load times. Turn this on only if you suspect your website has a bot issue.

Security Settings
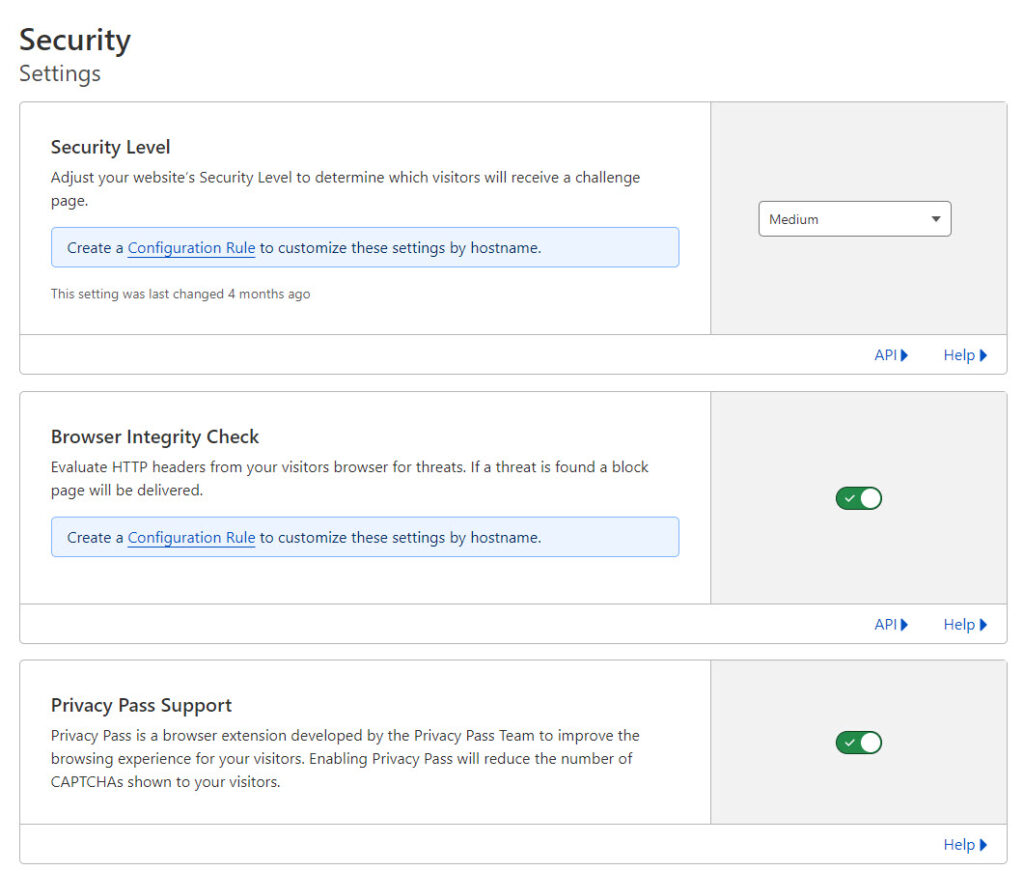
- Browse to Security > Settings, set the Security level to medium, and turn on Browser Integrity check and Privacy pass support.
- These security settings protect your website. If the security level is higher than medium, Cloudflare will show a challenge page to your visitors, which may detract from a good user experience. So use it only if absolutely needed.
Speed Optimization
In addition to the CDN service, which delivers an immediate performance improvement for your website, Cloudflare also provides additional speed optimization features.
- Browse to Speed > Optimization and turn on Auto Minify for Javascript, CSS, and HTML. Enable Brotli compression (similar to Gzip compression).
- The Minify and Brotli compression features reduce file sizes for transmission, making your pages lighter and faster to load.

- Turn on Early Hints under Optimized Delivery, but disable the rocket loader.
- Early Hints tells browsers to preload linked assets faster for faster load times.
- Rocket Loader is a feature that helps improve your pages’ paint time, but it has a known history of conflicts with other plugins. I have faced this issue on the Coolfundas blog, and it took me a while to figure out that this feature conflicted with the WP-Rocket cache plugin. You can try it out and see if it makes a difference, but ensure you do an in-depth test of your website before keeping it enabled long-term.

Cloudflare Caching Settings
Caching content on Cloudflare Edge servers delivers the primary CDN feature for your website.
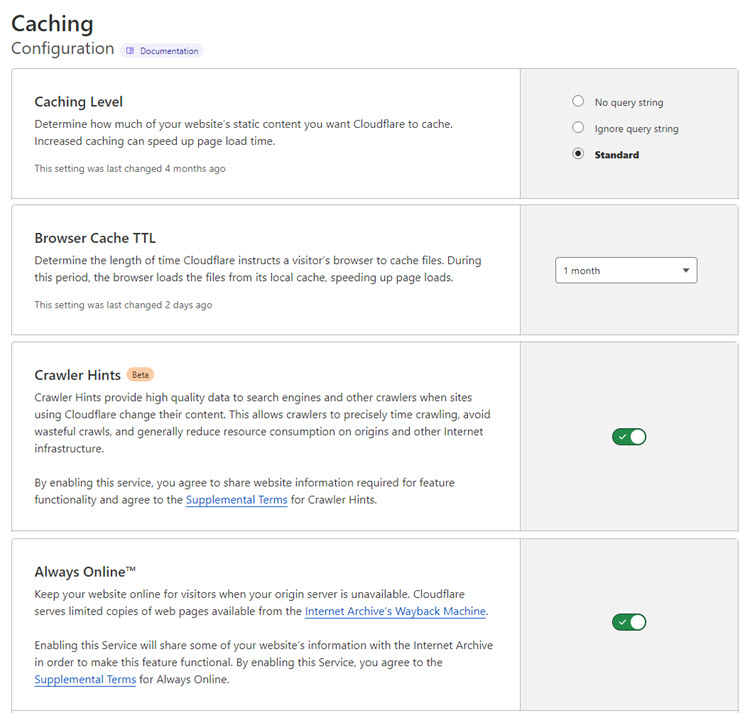
- Browse to Caching > Configuration: Set Caching level to Standard, Browse Cache TTL to 1 month, and enable Crawler hints and Always Online.
- The Caching level and Cache TTL set the level of content cached and how long the browser caches files.
- Crawler hints make search engine crawling more efficient, and Always Online serves pages of your website even if your server is down.
Cloudflare Page Rules for WordPress
Now that you have set up Cloudflare for WordPress, the next step is configuring some basic page rules for the CDN.
Page rules are a set of rules that lets you control how Cloudflare works on your website at a page or URL level. By setting page rules, you define the pages, conditions, triggers, and actions for when and how the CDN operates.
You can tell Cloudflare to exclude some pages from the CDN (bypass the CDN) or use the wildcard * to apply rules to all website pages or even a subset of pages.
The Cloudflare free CDN plan allows you to set “3” page rules. Let us look at a few key page rules that we can set up on the free plan.
Rule 1: Increase Security for Admin Pages and bypass cache
The administration page of any WordPress site is the gold mine for hackers and like. You want to make sure that this page has the highest protection. You also want to prevent the administration pages from being cached and ensure you see the latest pages.
Enter the URL as per the format below, and then set the security level to “High” and cache level to “Bypass” and disable apps and performance. Save the rule to activate.
yourdomain.com/wp-admin*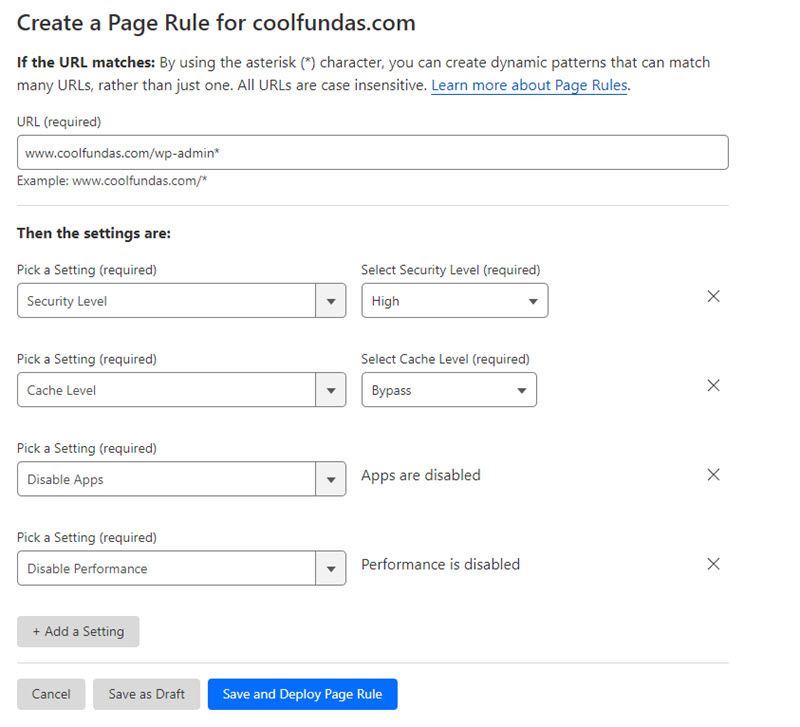
Rule 2: Stop Caching Preview Pages
Preview pages are the draft view of your edits, so you want to make sure that these pages are not cached.
Enter the URL per the format below, and set the cache level to “Bypass” to stop the caching of preview pages.
yourdomain.com/*preview=true*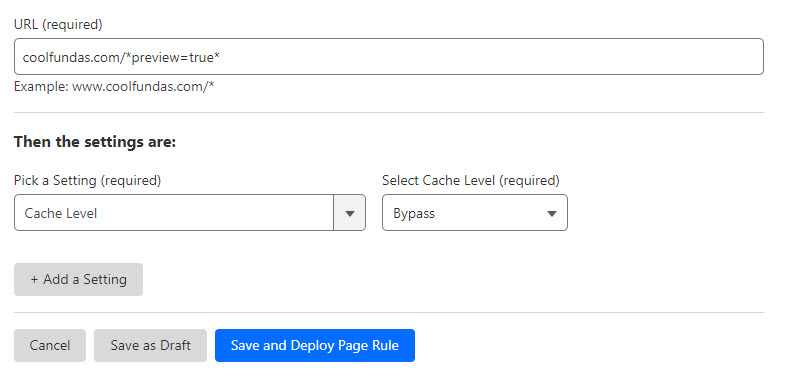
Rule 3: Forward XMLRPC URLs
XMLRPC is a popular target of brute force attacks. XMLRPC is an API that allows WordPress to communicate with external apps. If you were building a mobile app to communicate with WordPress, you would need it.
If you are not using it, you can disable XMLRPC. An alternative is to set a page rule to forward it to any URL like your home page.
To set a page rule, enter the XMLRPC URL as shown in the URL block below, select the “Forwarding URL” option with a 301 direct, and enter a destination URL like your home page.
yourdomain.com/xmlrpc.php*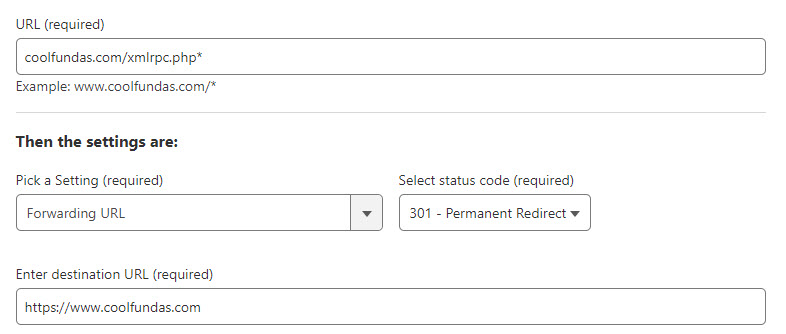
There are a number of other page rules that can also be set:
- Decrease bandwidth of WP Uploads
- Keep important pages always online
- Obfuscate email on the Contact page
- Stop caching of eCommerce dynamic content using AJAX
- Cache everything
You can decide which rules to set based on your need.
Frequently Asked Questions
Is Cloudflare CDN free?
Yes, Cloudflare does offer a free plan. The steps to a free Cloudflare CDN have been explained in detail in this article. If you are looking for a paid plan with advanced CDN features, check out the Cloudflare CDN pricing page for more details.
At a high level, the paid plans provided upgraded levels of security, improved performance and features like image optimization. The right Cloudflare plan is dependent on the type and size of your business. You will have to weigh all the factors and choose the right plan.

Do I need to install the Cloudflare WordPress plugin on my website?
Technically, you don’t need the Cloudflare plugin for WordPress. The free Cloudflare plan will provide CDN to your website without the plugin. In short, you can do without the plugin.
The plugin provides you the ability to apply default settings for Cloudflare in a single click, and manage some of the settings including Purge Cache from inside WordPress administration without going to the Cloudflare dashboard on the web. It is also needed if you sign up for Cloudflare’s APO plan for WordPress at $5.00 per month.
If you decide you need it, here is how you install and setup the Cloudflare WordPress plugin on your website:
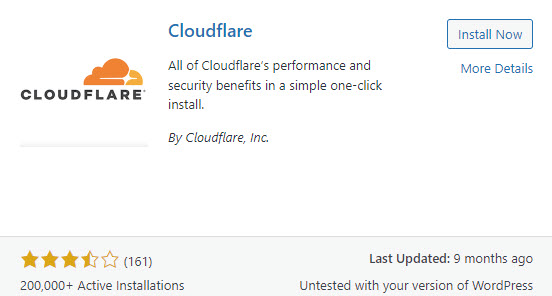
Install the Plugin: Browse to the WordPress plugin library and search for Cloudflare. Select and install the Cloudflare plugin.
Get the Global API Key from the Cloudflare Dashboard: Login to your cloudflare account, and go to your profile via the menu in the top right of the dashboard. Select the API token tab.
Click on the “View” option for the Global API key. You will be prompted for your account password. Enter the same, and view the Global API key, and copy the same.

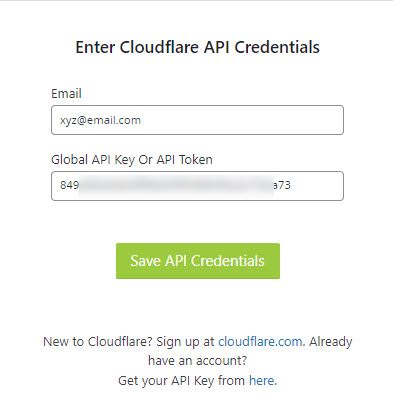
Update API key in Cloudflare CDN WordPress plugin: Head back to the WordPress administration and go to the settings option for the Cloudflare plugin. Click on Sign In. Enter your Cloudflare Account email ID and the Global API key in the fields provided. Click on “Save API Credentials” to complete the sign in process.
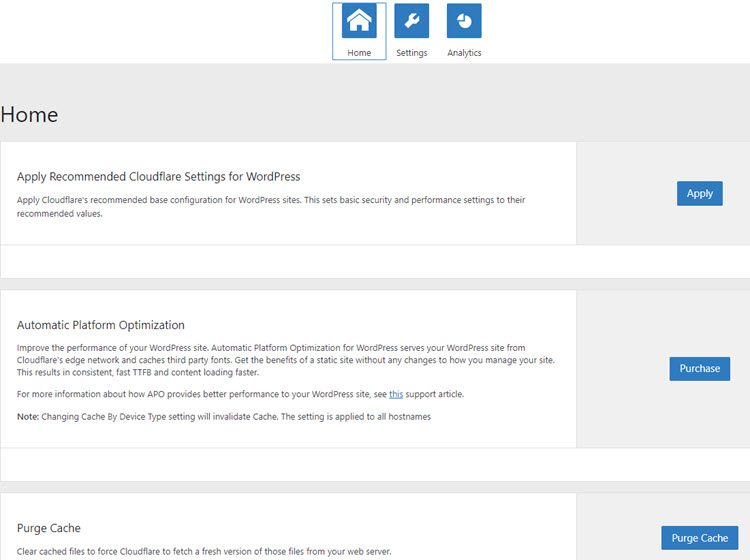
Apply Cloudflare Recommended Settings: After sign in, the plugin installation is complete, and you can go to the settings tab, and click on “Apply” to automatically configure recommended settings from Cloudflare for your WordPress website.
How to check if Cloudflare CDN is working?
You can check if Cloudflare is working in three ways:
- Option 1 – Use the browser inspect tool
- Option 2 – Use an HTTP Header checker tool
- Option 3 – Use a CDN Performance tool
I will go through all the options in detail.
Option 1: Use the Browser Inspect tool
- Open your WordPress website on the browser. You can open any URL on your website.
- Right-click anywhere on the web page, and select the “Inspect” option
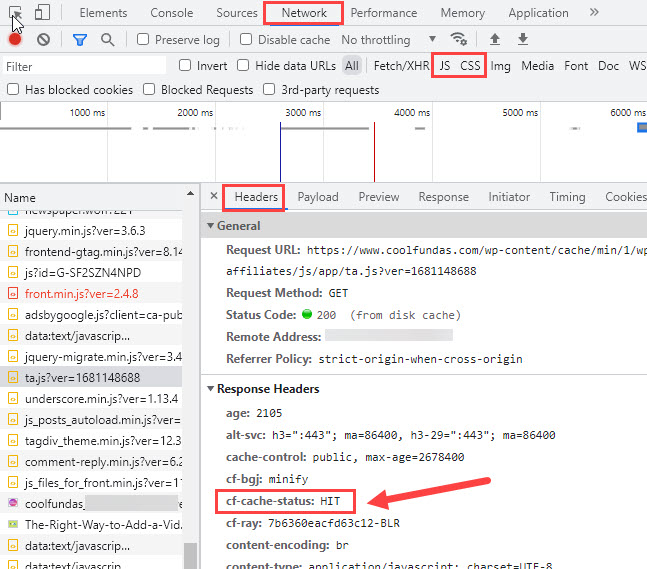
- Select the network tab on this console. Make sure you set the filter for JS or CSS files
- Select a JS or CSS file from the left nav bar, and view the header tab
- Scroll to the Response Headers section, and look for the “cf-cache-status”
- The cf-cache-status will have the value “HIT” if Cloudflare is working
- If the cache status is MISS, the page is not coming from the cache. Refresh the page and check again.
Option 2: Use an HTTP Header checker tool
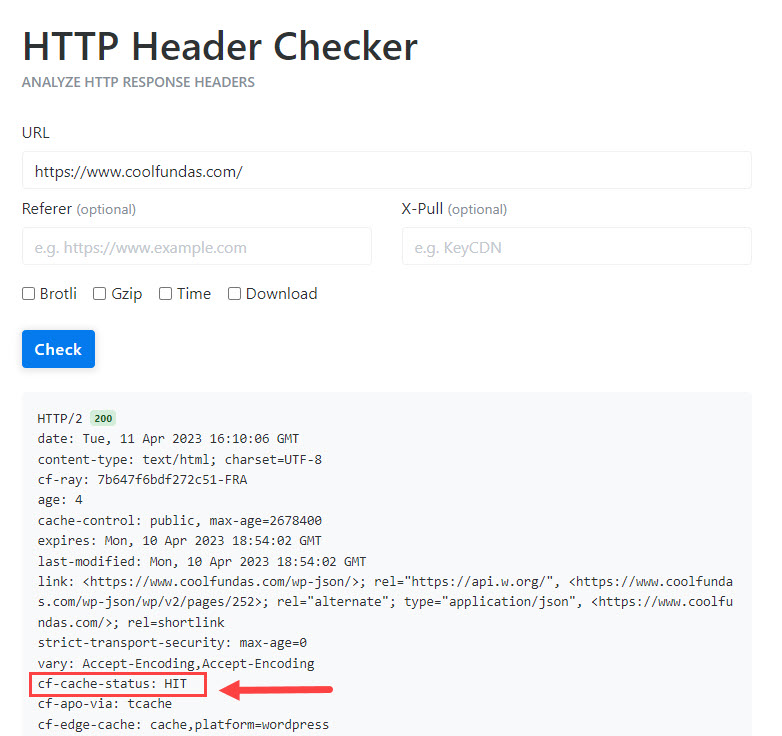
Use an HTTP header checker tool to view the response headers for a website page.
- Go to the HTTP Header Checker tool.
- Enter any URL for your website. It could be the home page or any post.
- Click on the “Check” button to run the checker tool.
- The header response will be displayed as shown in the image below.
- Look for the cf-cache-status = HIT. Refresh the page once if it shows as a MISS.
Option 3: Use a CDN performance tool
The previous options explained will help you check the working of the CDN from a single location. But how do you check if the CDN is working correctly for users across different geographical locations? To verify this, you can use the free CDN performance tool from Uptrends.
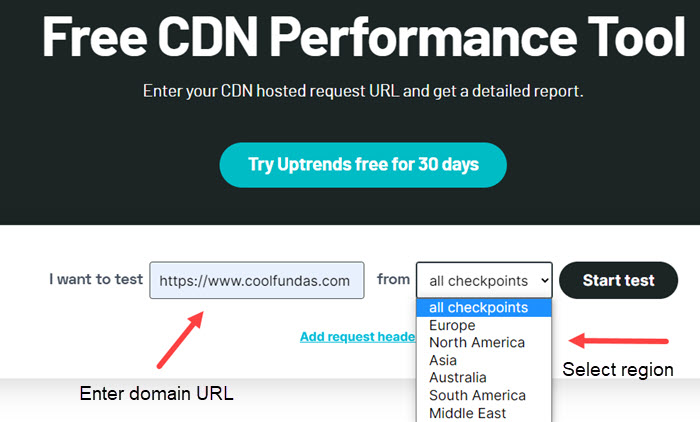
- Enter the domain of your website in the field provided
- Select the region you want to test for. You can verify “all checkpoints” or select a specific region, like Europe, if you get most of your traffic from this region.
- Click on “Start Test” to get the CDN performance tool running.
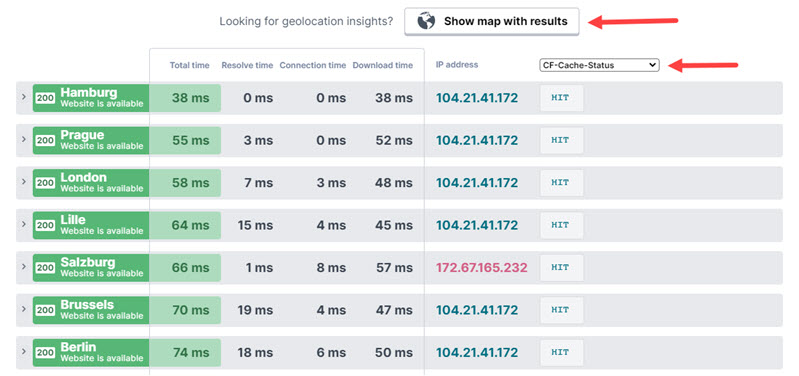
The test will take a minute or two to complete. The tool will check your website from different locations in the Europe region and will provide you with a summary table of results from each location. You can change the last column from “Date” to “CF-cache-status” to see if the CDN is a HIT or a MISS from that location. You can also click on each location to see the full response headers if you are looking for a drill-down into the details.
Will CDN from Cloudflare solve my performance problems?
While implementing a CDN is a vital piece of the performance puzzle, it is not the only one you should look at. A Good WordPress web hosting solution, along with a number of performance optimization solutions, should be looked at. To know more, read this article on how to speed up your WordPress website.
Conclusion
Cloudflare is a great free CDN tool that can power your WordPress website. The setup process is easy, and in a few easy steps, you can protect your website better and improve the performance and speed experienced by visitors to your website.
All the features described above are available on the free plan, so take advantage of the benefits provided. The usual caveat still applies – test your website to ensure nothing is broken. This is important.
If you have any comments or run into any issues, then please let us know in the comments section below.

