You have a website running on WordPress – it appears to be working fine, and load times seem ok. All this talk about speed feels like it is being blown out of proportion, so why do you need to spend time on how to speed up a WordPress site? The answer is that the definition of fast is changing.
The beginning of this century saw the dawn of the internet age with dial-up connections and slow internet speeds. Fast forward two decades and the world lives on the Web. People spend hours daily consuming information, news, entertainment, and streaming videos on super-fast broadband or fast 4G or 5G connections on their PCs, tablets, or palm-sized smartphones.
The most popular websites worldwide are highly optimized, run on scalable infrastructure, and deliver fast websites with quick page load times.
The bottom line is that today’s users have high expectations with short attention spans, and if you are running a WordPress website, making sure it is fast is an absolute necessity.
Why is It Important to Speed Up Your WordPress Site?
A great user experience for a visitor to your website is crucial because it means that:
- Users are more likely to spend more time on your site reading articles if you are a news site or a blog or browsing around your shop if you are an e-commerce portal.
- Which will likely result in higher conversion rates if you are selling products or recommending them,
- Or higher ad views and clicks if you monetize your website via Google Adsense or similar,
- Leading to higher revenue
Even if your website is not revenue-focused, a reasonably fast website is an essential prerequisite today.
The expected webpage load time is 2-3 seconds, and every second beyond that means fewer visitors, lower time spent on the site, and fewer conversions.
The speed of a website is also essential because Search Engines like Google use it as a ranking factor and impact your SEO too. Google calls this Core Web Vitals.
Google uses Core Web Vitals as a signal of the user experience of a website. So if you want your keywords and website to rank higher in the search results and drive more visitors, then the website must score well on core web vitals.
To begin with, you will need to test the speed of your WordPress website and then consider steps you can take to improve it.
How to Test WordPress Site Speed
If you already have your WordPress website up and running, getting a baseline of the website’s speed and performance is helpful. To do a WordPress website speed test, you can use the speed testing tools listed below:

They not only provide metrics on performance but will highlight areas where improvements can be made to make the website faster. With this baseline, you can track speed improvements as you implement the recommendations in this article.
While conducting performance tests, you should test for both desktop and mobile, the geographical location of the user, and internet bandwidth. The WebPageTest tool allows you to configure all three parameters while running the test. This will enable you to replicate the performance of various device combinations, bandwidth, and user locations to give you a better sense of overall performance.
How to Speed Up a WordPress Site
We can break down what you can do into three different areas:
- Things you can do while setting up a WordPress website that will give you good speed straight out of the box
- Best Practices you should follow to keep your web pages light and deliver faster load times
- Advanced Optimization techniques to fine-tune and speed up WordPress.
In many ways, this is no different from building a car to go faster. You start with a fast car, make it lighter to go faster, and then tune up the engine, suspension, etc., to give it an extra edge. Right? Getting WordPress to work more quickly is not all that different, so let’s dive into how to speed up a WordPress site.
1. Select a Good WordPress Host
WordPress hosting has two aspects: the type of hosting and the hosting provider. When we talk about the type of hosting, we refer to the server setup and the resources you have access to.
Types of WordPress Hosting
- Shared Hosting: You are essentially sharing a server with other users. This is the most affordable type of hosting and is excellent for beginners to get started and familiarize themselves with the world of WordPress. Do note that on a shared server, performance can vary depending on the load on the server. If some other user’s website on the same server is seeing a spike, it might affect the speed of your website.
- Virtual Private Server VPS Hosting: A VPS hosting service is similar to shared hosting, with one significant difference. You get dedicated resources for your account regarding RAM, CPU, and Storage on the server. This helps insulate and de-link your website’s performance from another user’s website running on the same server. It is more expensive than shared hosting.
- Dedicated Hosting: Dedicated hosting is the top tier of WordPress hosting and the most expensive. It is similar to VPS hosting in terms of the service, but you get a dedicated server and are not sharing with other users. So more resources, CPU, and storage allow you to handle a higher website traffic load while maintaining performance levels.

Hosting Providers
When setting up a WordPress website, selecting a hosting provider with a robust infrastructure, reliability, and optimized WordPress performance is essential.
- Bluehost and Dreamhost are your best options at the affordable or budget end.
- Siteground and A2 Hosting do a pretty good job in the mid-range.
- Kinsta, WP Engine, Flywheel, or Cloudways – If you are an established website with high traffic, you can’t go wrong with these hosting providers.
While choosing a hosting provider, you should also check the available server locations. Ideally, you would want to select a provider with servers close to your target audience. For example, if your visitors are from Asia, hosting your website on a server in the USA is not recommended. It would mean that the web traffic has a longer distance to travel, impacting load times and, ultimately, user experience.
2. Use a Fast or Optimized Theme
Why: A theme with many features, a lot of dynamic content, or one that looks great isn’t always the best for speed. A theme may look great, but if it has not been coded well or has a lot of code, it will negatively impact the website’s performance.

How: If performance is critical, the best thing you can do is go for a lightweight, optimized theme. Themes like GeneratePress, Neve, Astra, Sydney, and OceanWP are known for being fast and highly optimized.
3. Cache your Web pages
Why: Caching your web pages is the fastest and most straightforward way to speed up a WordPress site. And if you are on shared hosting, it will make a lot of difference to page load times.
If you don’t have a cache setup, WordPress will build the page on the server side every time a user visits your website and then deliver it to the visitor. Building a web page involves putting together HTML, CSS, and JS elements along with queries to the database, which takes time. And remember, this will have to be done for every visitor. This not only increases load time but also increases the usage of resources on the server.
If you implement caching, the webpages are built the first time, and the completed webpage is stored in a cache. Then, every new visitor is served the page directly from the cache. This eliminates the build process for every visitor, decreases load time, and reduces server usage.
How: You can easily implement this using a WordPress caching plugin like WP Rocket, W3 Total Cache, or WP Super Cache. Some hosting providers also provide caching as part of the plan. All you have to do is turn on the built-in cache feature if it is available.
4. Use a Content Delivery Network CDN
Why: Your server is located in one part of the world, but your visitors could be from anywhere across the globe if your website caters to an international audience. Web page load times will vary worldwide depending on the distance to your server. For example, if your website is hosted on a USA server, a US visitor will see faster load times than someone from Australia.
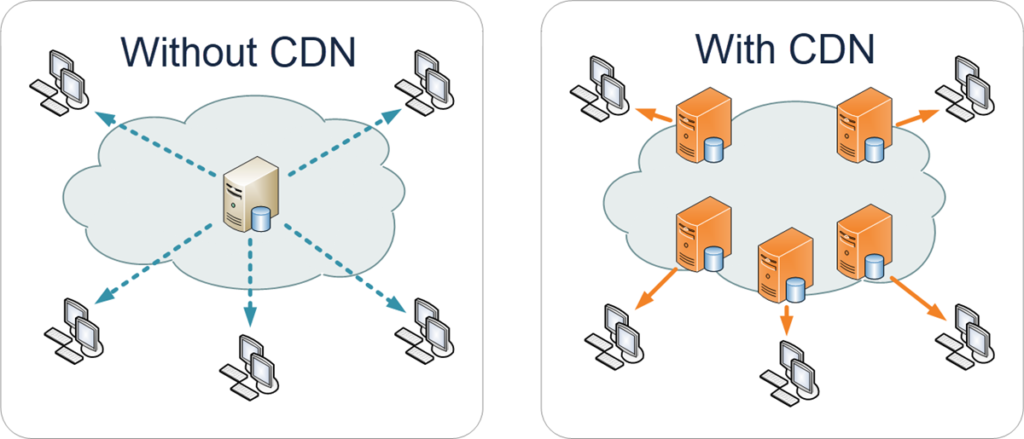
How: Installing a Content Delivery Network (CDN) is the best way to equalize load times for visitors or users worldwide. As the name suggests, a CDN is a network of servers worldwide that can deliver content to users in that region or location.
A CDN will replicate your website on data centers at multiple locations spread geographically by caching all your static web pages, including images. A visitor to your website will have the pages loaded from the server closest to them rather than your origin server. A CDN, in combination with a caching plugin, can deliver a good speed upgrade to your WordPress website.
Cloudflare is among the more popular CDNs in the market and even offers a free CDN plan. BunnyCDN and Stackpath are other popular options that you should consider depending on your needs.
Related Articles: The Best CDN for WordPress
5. Optimize Images
Why: Images add color to your post and give it a visual appeal known to help with reader engagement. However, images also increase the size of your web page, directly affecting page load times.
Images usually account for a significant part of the web page’s size, which means that reducing image sizes will significantly reduce the web page’s size. So, this is a must-do activity while developing or uploading content for your website.
How: There are three ways to reduce the size of the images on your website:
a. Resize your original images for the Web:
Photos look great when they are high-resolution. Unfortunately, a high-resolution image with a good camera will usually be upwards of 4000 pixels and have a file size of 7+Mb or more. Using an image of this size will severely slow down your website.
So the first thing you need to do is to resize or scale down the image for the Web, depending on how you use it on your website.
- Background Image: 1920 x 1080 px width (16:9 aspect ratio)
- Full-Width Post Featured Image: 1280 x 720 px width (16:9)
- Blog post image: 1200 x 675 px (16:9)
- Logo (Square): 250 x 250 px (1:1)
- Product Images: 800 x 800 px (1:1)
The image sizes listed above are our recommendations. The size and aspect ratio of the images you use may vary, but you should size them according to the display area on the web page.
Use any photo editing tool on your PC, and resize the images to the correct size.
b. Use Image Formats optimized for the Web:
There are many image formats: JPEG, PNG, TIFF, and WEBP. On Coolfundas, we primarily use JPEG and PNG formats for our images.
JPEG is a lossy image format, meaning the image has a slightly lower quality but a smaller file size.
PNG is a lossless format and is great for images where quality is important or image has a transparent background. However, the file size tends to be higher with PNGs.
TIFF images are great quality-wise, but their file sizes can be massive, so they are not recommended for the Web.
WEBP is a new image format developed by Google intended to replace JPEG. WEBP delivers superior compression with minimal reduction in image clarity and is slowly becoming the new standard for images on the Web.
For most sites, the JPEG format is ideal for all images except those where image clarity is important, for which PNG is your best option.
c. Compress your Images:
The final step is to compress these images using a tool.
You can do this in two ways:
The first option is to use a tool on your PC/Desktop or an online tool to compress the images before uploading them.
Alternatively, the more straightforward option is to use an Image Optimization Plugin which will do the job for you. Install the plugin, set the image format and compression levels, and the plugin will automatically compress the files as you upload images.
Some popular image optimization plugins are ShortPixel, Imagify, Smush, and EWWW Image Optimizer.
In addition to compressing your image files, optimization plugins can convert and deliver the WEBP format in your web pages instead of JPEGs or PNGs.
6. Paginate Comments
Why: Comments are great. It means that you have been able to engage well with your audience, and your users are contributing to valuable discussions around the topic of your post.
A lot of comments can be a problem from a page load point of view – there is much more content to load on your page, which slows it down. However, the solution is relatively simple.
How: WordPress offers an out-of-the-box feature to paginate comments. Go to Settings > Discussion > Other Comment Settings. Then, select the checkbox for the option “Break Comments into pages with x top-level comments per page….” and enter a value for the number of comments per page (25, 50, etc.).
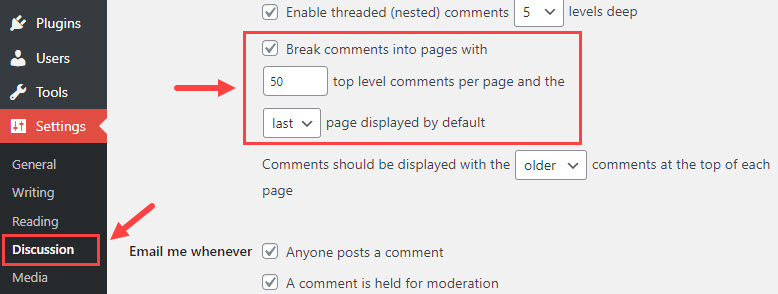
By limiting the comments, your web page will load only the first page of comments instead of all comments, reducing the web page size and allowing it to load faster.
7. Minimize Plugin Usage
WordPress plugins are a great add-on, giving you the power to add features you need that are unavailable in the core WordPress installation.
Examples: Page builder, Contact form, or a Slider plugin.
But too much of anything isn’t necessarily a good thing. The more plugins you add, the heavier your website will be; if the plugin is not efficiently coded, it will be more bloatware.

So your approach to plugins needs to be two-fold:
- Avoid adding plugins for features that are nice to have. Limit plugins to features you need and add value to your website. Remove the rest of the plugins from your WordPress installation, if any.
- Install or use plugins with quality code or lightweight. This will not be apparent to most of us. Your best bet is to research the feature you need (must have) and select plugins that are highly popular or come from well-known plugin developers.
8. Minimize Third-Party or External Scripts
Why: Third-party or External scripts are typically Javascript, CSS, font files, etc., stored on a third-party server and not on your website. These could include Google Analytics, Facebook Pixels, Twitter, Adsense, Disqus Comments, etc.
The more third-party scripts you need to make requests to, the slower your website.
How: Most of these scripts will be invoked by plugins, so the best thing you can do here is to limit or minimize the plugins you install to only those necessary.
9. Keep the Website Updated
This might not appear to impact your WordPress speed significantly. However, WordPress is an open-source project, and features or bug fixes are continuously released. It is in your interest to keep the website up to date to maximize performance and security.
This applies to WordPress Core installation, Themes, and Plugins. You can take advantage of the auto-update feature or update manually periodically. Please ensure you back up your WordPress installation regularly (to use for restoration if an update breaks your website).
10. Simple or Minimalist Web Page Design
Keeping the design of your web page simple and minimal is a crucial factor that can help speed up a WordPress site.

To design a minimalist website, keep the following points in mind:
- Keep Page elements (Rows, columns, Text boxes, sliders, etc.) to the minimum. If you are unsure you need it, you probably don’t. Fewer elements mean less code.
- Simplify elements where possible, and avoid nesting elements (elements within elements) as much as possible. More elements mean more code to parse during rendering.
- If you use a visual page builder tool, it is easy to get carried away designing visually excellent content. This will not help the speed of the web page. You will need to balance visual appeal and simplicity.
Remember, sometimes less is more.
11. Optimize Javascript / CSS
Why: The best approach to optimizing Javascript or CSS is to minify them.
But what is minify or minification of Javascript or CSS?
- When developers write code, they usually add comments for reference or add whitespace and line breaks to make the code readable, meaningful variable names, etc.
- Minification is the process of removing redundant comments, whitespace, and line breaks from the code and replacing longer variables with shorter variables.
- Minification results in an optimized code with a compact file size, thus improving webpage load times and website experience.
How: You can minify Javascript and CSS using a WordPress plugin like Autoptimize (free) or WP-Rocket (Premium).
12. Optimize the WordPress Database
Why: With time, the WordPress database will grow, and the larger it becomes, the longer it will take for the server to retrieve or query information from the database. The best thing you can do is clean up or optimize your database regularly.
The cleanup process will involve removing comments marked as spam or trash, data from old or unused themes or plugins, revisions, etc.
How: If you are technically inclined, you can obviously clean this manually using PHPMyAdmin to access the database and tables, but it can result in issues if not done carefully and properly.
The best way to optimize the database and speed up a WordPress site is to use any of the plugins listed below to complete this task safely and efficiently.
- WP-Sweep (Free)
- WP-Optimize (Free)
- WP-Rocket (Premium)
Important: Please ensure you have backed up your WordPress installation before manually optimizing the database or using a plugin.
13. Limit Revisions
Why: Revisions, as the name suggests, are a copy of the edits you made to a post. Every time you edit and save a post, the previous version remains in the revision history. This gives you the advantage of reverting to an earlier version of your post in case you need to.
While this is a great feature, it also means you can quickly build up revision history over time, taking up space and slowing down your WordPress website. The solution is to limit the number of revisions you want to keep for every post.
How: You can limit the number of revisions to store. Let us say you want to store a post’s last 5 (five) revisions at any time. To implement this limit, you will need to access and open the wp-config.php file and add the following lines of code to it:
define( 'WP_POST_REVISIONS', 5 );
If you want to disable revisions completely, add this line of code instead:
define( 'WP_POST_REVISIONS', false);
14. Implement Compression
Why: Using compression for your website is no different than zipping your files on your PC. The purpose is the same – reduce the file size for storage or transmission.
Gzip and Brotli compression are tools for compressing the size of a webpage on the server side. The webpage is then unpacked on the browser’s end for display to a user.
Using this website compression test tool, you can check if compression is already enabled for your WordPress website.
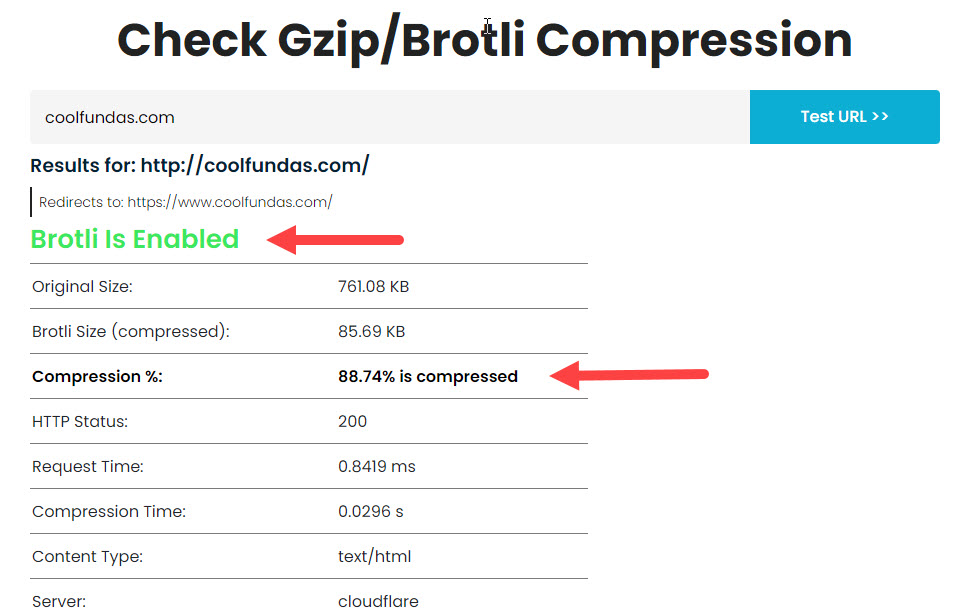
How: To enable gzip compression or Brotli, there are a couple of ways to do it:
- Manually add code to your .htaccess file
- Use a plugin like WP-Rocket to implement compression.
- If you are using a CDN, check if it has an option for compression. For example, Cloudflare CDN has the option to activate Brotli compression.
15. Lazy Load Images
Why: Lazy loading images is another technique to speed up a WordPress site. With lazy loading turned on, you only load those images visible in the browser’s viewport for a user. The images are loaded as the user scrolls down the web page.
In short, the initial web page renders with only the visible images giving the user the feeling that the page is loading fast, improving the general user experience of your website.
How: Smush, Lazy Load by Optimole, and Lazy Load Plugin by WP-Rocket are popular plugins you can use to implement lazy loading images for your website.
16. Host Videos on External Video Platforms
Why: Videos are great for any website, adding a useful visual element to a post or page. The normal way to use a video in a WordPress post or page is to upload it to the media library and add it to the page or post using a video block.
While uploading a video to WordPress is the default option, there are disadvantages to this approach:
- Video files tend to be huge and take up storage on your hosting server, and
- More importantly, videos stream from your host server using bandwidth and resources. Many hosts have bandwidth limits on your hosting plans, and if you have many videos, you will quickly run out of bandwidth, putting your hosting at risk of additional bandwidth fees or even suspension.
- Your backups will also grow in size, making it more difficult to back up your website easily.

How: The right way to handle videos in WordPress is to use a third-party video hosting solution like YouTube, Vimeo, or Dailymotion to upload and store your videos.
After uploading, get the video URL (see example on embed URL for a YouTube video), and use the video embed block in WordPress to add it to a post. By taking the embed route, you avoid stretching your server resources and minimize storage and bandwidth constraints from your WordPress host.
In addition, third-party video solutions are highly optimized for processing and streaming videos and will deliver a faster and better experience for your users.
17. Update your PHP version
WordPress is written in PHP, a server-side language that runs on your hosting server. PHP updates are released periodically, including optimizations to help WordPress run faster.
It is highly recommended that your WordPress run on the latest stable version of PHP. You can check the latest version on the PHP website.
You can check the PHP version of your WordPress website by going to Tools> Site Health. Select the Info option at the top, scroll down to the Server section, and look for the PHP version.
If you are not running WordPress on the latest stable version of PHP, you should upgrade it. Most hosts will offer you the option to change the PHP version; if you don’t have the option, contact the support team at your host. If your host only offers an older version of PHP, then it is time to change your WordPress host.
Before updating your PHP version, ensure you have a backup of your WordPress installation. If you run into issues, you can always restore from your backup.
18. Preload Largest Contentful Image and Critical Images
While lazy loading is excellent for below-the-fold images, i.e., images below the viewable area of the screen, it should not be implemented for above-the-fold or critical images—typically, the featured image, author image, website logo, and icon.
These images should not be lazy-loaded. Instead, they should be preloaded to be prioritized and visible to a user as soon as the page loads.
You can achieve by adding the “preload” tag to these images manually (requires some code snippets), or simply use a plugin like FlyingPress or Perfmatters which include a feature that preloads the largest contentful image and any critical images above-the-fold.
WordPress Website Speed Optimization Plugins
Before we wrap up, it is worth pointing out that quite a few of the recommended steps above can be implemented using a speed optimization plugin. With a plugin, you can cache your pages, minify your JS and CSS files, optimize your database, implement compression, lazy load images, etc.
Free and premium caching plugins that effectively deliver these optimizations for you are available.
WP Super Cache and W3 Total Cache are free WordPress speed optimization plugin options, while WP-Rocket and FlyingPress are your premium options.
Wrapping Up
If your website is already up and running and you are keen on a quick speed upgrade, installing a speed optimization plugin and a CDN is your best option. But don’t stop here – implementing the rest of the recommendations should still be on your plate and should be taken up.
Selecting the right WordPress host, using a fast theme, a minimal design philosophy, and offloading videos to a third-party host may take time but are well worth it in the long run, and you should get to it when you can.
If you are starting a new WordPress website, everything in this article should be on your to-do list.
Let us know your experience in optimizing your WordPress website for speed. If there are techniques you have used and found beneficial, please let us know in the comments below.

